
You just noticed water dripping from the top of your toilet fill valve, and now you’re wondering if this means tearing apart your entire toilet or hiring a plumber. Good news. Most top fill valve leaks get fixed in under 15 minutes with a $3 part and zero special skills. The root cause is almost always a worn rubber seal or loose cap, not a catastrophic failure. We’ll walk you through the simple tightening and cleaning steps that solve 80% of cases, show you how to swap that tiny seal when needed, and help you spot the rare situations where you actually need a new valve.
Quick Fixes and Common Causes of Top Fill Valve Leaks

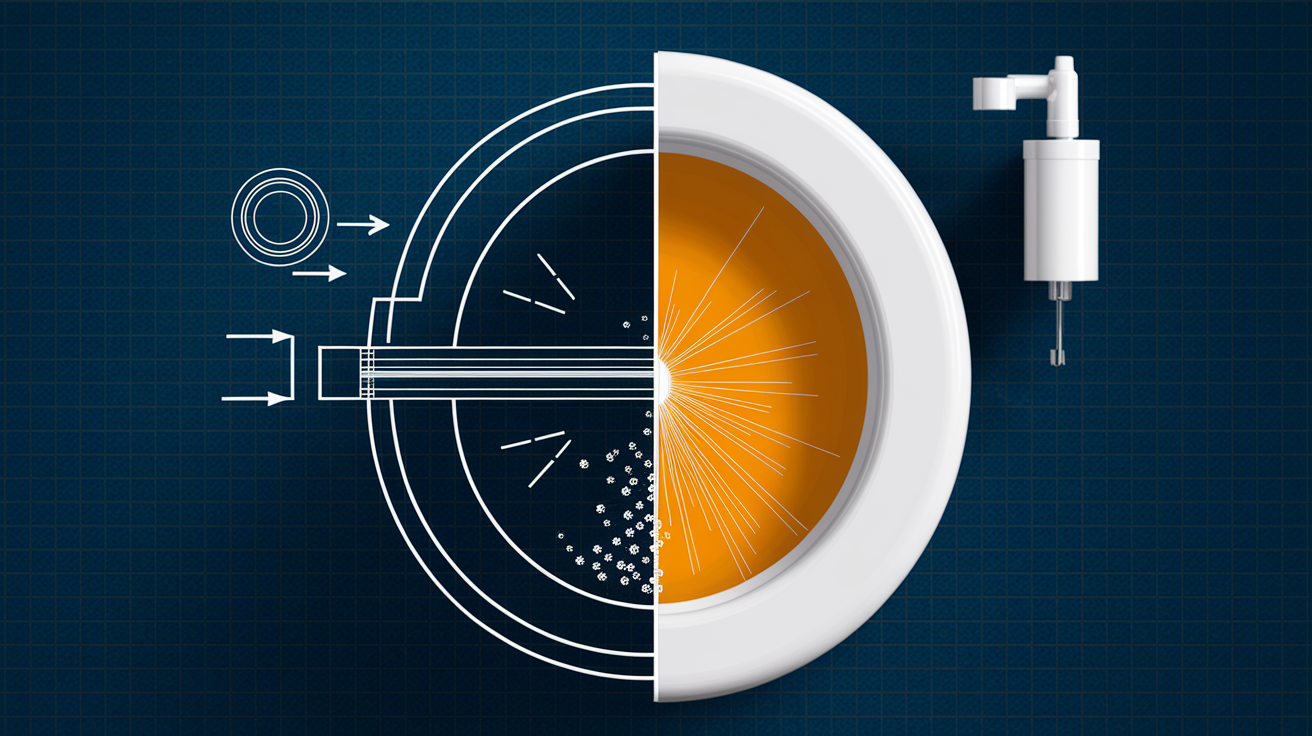
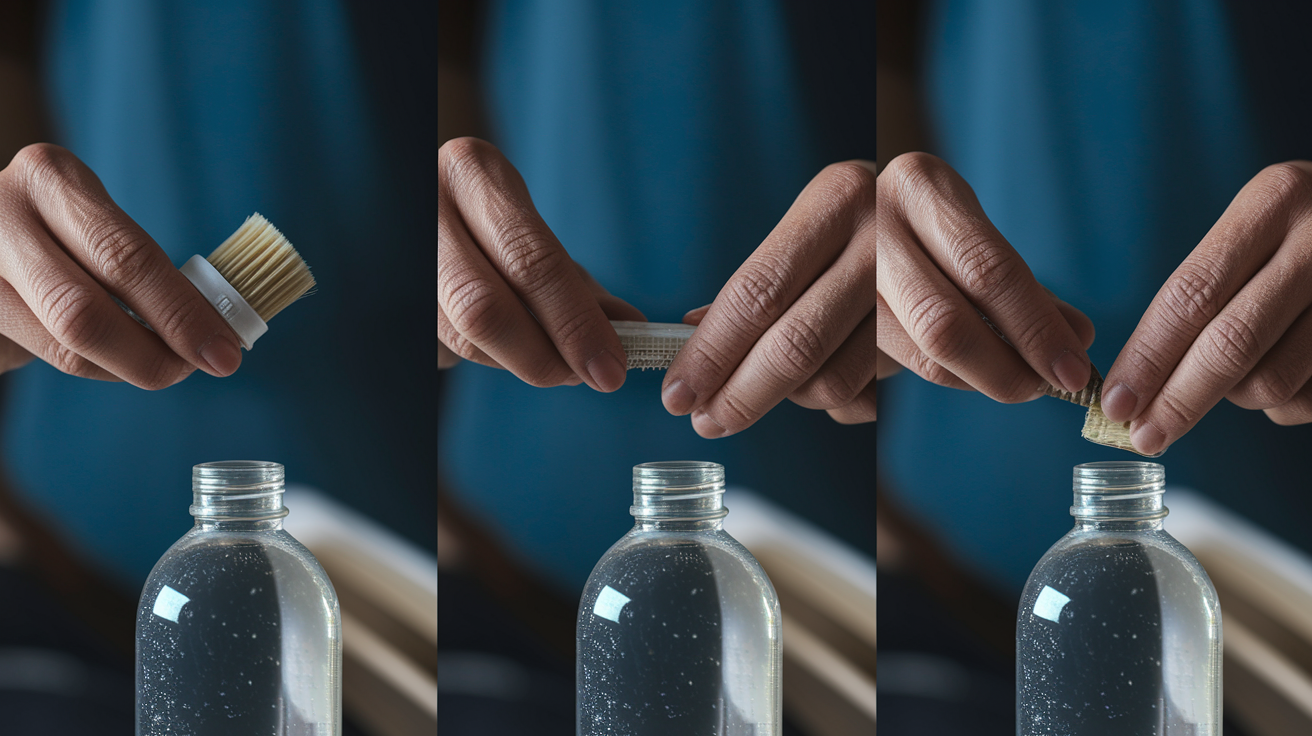
Water dripping or spraying from the top of your fill valve usually means a failed seal, and you can often fix it in minutes without swapping the whole valve. Here’s the quick three step drill: Try tightening the threaded cap by twisting it clockwise. Hand tight only, no tools. That alone solves about 30% of cases right away. If it’s still leaking, turn off the water supply, remove the cap by twisting it counterclockwise about one eighth of a turn, then check for visible debris or mineral buildup under the seal. Clean it with an old toothbrush, reseat the cap, and test again. If the leak persists after cleaning, the cap seal or O-ring needs replacement. Costs $3 to $5 and takes about 15 minutes. These three steps account for roughly 80% of top leak fixes.
Root causes of fill valve leaking from the top:
- Worn or deteriorated cap seal/O-ring, which is the most common culprit, typically age related after 3 to 5 years of use
- Loose threaded cap needing simple hand tightening, often loosens gradually from vibration
- Mineral deposits and calcium buildup preventing proper seal contact with valve stem
- Debris lodged under the cap seal blocking complete closure, usually small particles from water supply
- Cracked valve housing or cap from overtightening or physical impact, which requires full replacement
- Faulty installation with improper cap seating or misaligned locking tabs
- Age related component wear beyond just the seal (typical valve lifespan is 5 to 7 years)
About 90% of top leaks get fixed by replacing just the cap seal. Costs $3 to $5, takes 15 minutes, and requires no special plumbing knowledge. You remove the cap, pop out the old rubber seal, press in a new one, and snap the cap back on. Full valve replacement becomes necessary when you find cracked housing, multiple worn components failing together, or a valve that’s older than 7 years and showing signs of general deterioration. A complete replacement costs $10 to $15 and takes 30 to 45 minutes.
Ignoring a top leak isn’t just annoying. A steady drip wastes 30 to 50 gallons of water daily, which translates to 900 to 1,500 gallons per month. That can inflate your water bill by $20 to $40 monthly. The constant moisture can damage the toilet tank lid, promote mold growth on surrounding surfaces, and create water stains on the floor if drips reach that far.
Essential Tools and Replacement Parts for Fill Valve Repair

Gather everything before you start. Mid repair trips to the hardware store with a toilet partially disassembled just add frustration and extend what should be a quick 15 minute fix into an hour long ordeal.
Tools needed:
- Adjustable wrench or slip joint pliers for supply line connections and lock nuts
- Bucket and several towels or old rags to catch water spillage during removal
- Flashlight or headlamp because tank interiors are shadowy, especially behind the fill valve
- Old toothbrush, stiff bristles work best for scrubbing mineral deposits
- Screwdriver, flathead or Phillips depending on your toilet model (some caps have set screws)
Replacement parts and materials:
- New fill valve cap seal or O-ring kit, $3 to $8 at any hardware store
- Complete replacement fill valve if the housing is cracked, $10 to $15
- Plumber’s thread seal tape, also called Teflon tape, for supply line threads
- White vinegar in a spray bottle, dissolves calcium and mineral buildup effectively
Stick with quality brands when replacing the entire valve. Fluidmaster 400A is the industry standard, fits most toilets, and replacement parts are available everywhere. Korky QuietFill costs a bit more but runs quieter and uses durable components. Universal fit valves work for about 95% of residential toilets. But if you have an older toilet from the 1980s or earlier, or a specialty model like a pressure assisted unit, bring your old valve to the store to verify compatibility. Spending an extra $3 for a name brand valve instead of the cheapest option usually means 7 years of reliable service instead of 3.
Step by Step Guide to Diagnosing Your Top Fill Valve Leak
Proper diagnosis saves you time and money by identifying exactly what’s wrong before you start unscrewing things. A loose cap takes 10 seconds to fix. A cracked housing means you need a new valve. Guessing wrong means you’ll buy parts you don’t need or miss the actual problem entirely.
Start with the simplest possibilities and work toward the more complex. Most top leaks come from worn seals or loose connections, not catastrophic failures. If you jump straight to replacing the whole valve without checking the basics, you might spend $15 and 45 minutes fixing a problem that needed a quarter turn tightening.
Diagnosis steps:
- Turn on the bathroom light and carefully lift the toilet tank lid straight up. Set it somewhere safe where it won’t get knocked over.
- Observe the fill valve top while the tank is full and not actively filling. Look for active dripping, fine spray patterns, or visible moisture collecting on the cap.
- Run your hand around the threaded cap to check for looseness. If it rotates easily, that’s your problem.
- Inspect the cap and valve stem closely for visible hairline cracks or damage. Use your flashlight and look from multiple angles.
- Check for white crusty deposits or greenish mineral buildup around the cap threads. This prevents proper sealing even with a good gasket.
- Listen carefully for hissing sounds that indicate air or water escaping from the seal. Flush once and listen during the entire fill cycle.
Visible cracks anywhere on the valve housing or cap mean you need a full replacement. Plastic doesn’t heal itself. A loose cap or heavy mineral buildup, on the other hand, indicates simple fixes. If the leak only appears during the fill cycle and stops when the tank is full, you likely have debris stuck under the seal that’s preventing it from seating correctly. Cleaning usually fixes this. If the leak is constant regardless of whether water is flowing, the seal itself has deteriorated and needs replacement.
Complete Fill Valve Repair Guide: Seal Replacement and Full Valve Installation
This section covers everything from a simple 15 minute seal swap to a complete valve replacement. Always try seal replacement first. Costs $3 to $8, takes 15 to 20 minutes, and fixes the problem about 70% of the time. Move to full replacement only when you find cracked housing, multiple components failing together, or a valve that’s over 7 years old and showing general wear.
Cap Seal Replacement Only
- Turn off the shutoff valve by rotating it one quarter turn clockwise. It’s the oval or football shaped knob on the water line coming from the wall behind your toilet.
- Flush the toilet to drain most of the water from the tank. Hold the handle down to empty as much as possible.
- Twist the fill valve cap one eighth turn counterclockwise. Some models have tabs you press inward while turning.
- Lift the cap assembly straight up to remove it from the valve stem.
- Remove the old rubber seal or O-ring from inside the cap. It sits in a groove and may be stuck from mineral deposits.
- Clean the cap threads and valve stem thoroughly with your toothbrush and white vinegar to remove all mineral deposits, calcium scale, and debris. This step prevents future leaks.
- Install the new seal by pressing it firmly into the cap groove, making sure it sits flat with no twists, folds, or gaps.
- Place the cap back onto the valve stem, ensuring proper alignment with any tabs or guide notches.
- Twist one eighth turn clockwise until it locks into place or until the tabs click. Hand tighten only, never use pliers or a wrench.
- Turn the water supply back on slowly and observe for leaks during one complete fill cycle.
Some water dripping during the first fill after you turn the supply back on is normal. Air trapped in the line works its way out. Run two or three complete flush cycles to confirm the repair holds. If water still leaks from the top after the third flush, the valve stem threads might be worn, or the housing could have a crack you didn’t spot during inspection. At that point, move to full valve replacement.
Complete Fill Valve Replacement
- Turn off the shutoff valve completely. One quarter turn clockwise until it stops.
- Flush the toilet and hold the handle down to drain maximum water from the tank.
- Place towels on the floor beneath the supply line connection and position your bucket to catch remaining water.
- Disconnect the water supply line from the bottom of the tank, the threaded connection under the tank. You may need an adjustable wrench, and expect some water to drip out.
- Unscrew the plastic lock nut holding the fill valve to the tank bottom. Reach inside the tank to access it. Turn counterclockwise, and some water will spill as you loosen it.
- Lift the old fill valve assembly straight up and out through the tank hole. Tilt it slightly if needed to clear the overflow pipe.
- Slide the rubber gasket onto the threaded shank of your new fill valve with the cone side pointing down toward where the nut will go.
- Insert the new valve through the tank hole from inside the tank.
- Hand tighten the lock nut from underneath the tank bottom. Make it snug but don’t crank down with tools or you’ll crack the plastic threads.
- Reconnect the water supply line to the valve threads at the bottom. Tighten until secure but not over torqued.
- Clip the small refill tube into the top of the overflow pipe, the tall tube in the center of your tank.
- Turn the water supply back on slowly and check immediately for leaks at the supply connection and around the lock nut on the tank bottom.
- Allow the tank to fill completely and observe the final water level. It should stop ½ to 1 inch below the top of the overflow pipe.
- Adjust water level if needed. For screw type floats, turn the adjustment screw (clockwise lowers the level, counterclockwise raises it). For clip type float cups, squeeze the clip and slide the cup up or down the valve shaft. For older arm style floats, gently bend the metal arm slightly.
Check all connection points carefully during the first few fills. Watch the supply line connection under the tank, the lock nut area, and around the base of the valve where it passes through the tank hole. Any moisture there needs immediate attention. It may take one or two flush cycles for everything to seat properly and for you to find the right water level setting. A level that’s too high wastes water by constantly trickling into the overflow pipe. Too low and your flushes will be weak and incomplete.
Most quality valves come with detailed manufacturer instructions specific to that model. Keep that paperwork. Valves typically carry a 5 year warranty, and you’ll need your receipt and model number if you ever need to make a warranty claim. Proper installation now prevents top leaks, bottom leaks, and water level problems for the next 5 to 7 years.
Diagnosing and Fixing Persistent Leaks After Repair

Some situations need additional troubleshooting beyond the standard seal swap or valve replacement. These scenarios usually point to complications you didn’t spot during the initial diagnosis or problems that developed during the repair itself.
Leak Persists at Top Despite New Seal and Proper Installation
Verify the valve stem threads aren’t stripped or cross threaded. Run your finger along them to feel for damaged areas. If the threads are mangled, the valve needs replacement because the cap will never seal properly. Check that your replacement seal matches the exact specifications for your valve model. Not all seals are identical. A seal that’s even 1 millimeter too thick or too thin won’t create a watertight barrier. Inspect for hairline cracks in the cap housing that are visible only under direct bright light. Hold a flashlight behind the cap and look for light bleeding through plastic. Consider whether your home’s water pressure exceeds the valve’s specifications. Anything over 80 PSI can force water past seals designed for normal residential pressure. This may require installing a whole house pressure regulator.
New Leaks Appearing at Base or Supply Connection After Top Repair
Disturbing the valve during top repair sometimes loosens connections at the bottom that were already borderline secure. Tighten the lock nut from underneath the tank a quarter turn at a time, testing after each adjustment. Avoid overtightening plastic components. They’ll crack. If you see leaking at the supply line connection, turn off the water, remove the connection completely, wrap the threads with 3 to 4 layers of plumber’s tape in a clockwise direction, then reconnect and tighten. If the leak continues at the supply connection point, replace the rubber washer inside the supply line coupling or replace the entire braided supply line. New supply lines cost $8 to $12 and eliminate any question about worn washers or internal deterioration.
Toilet Runs Continuously Despite Successful Fill Valve Repair
This means the problem was never the fill valve. It was the flapper or flush valve assembly at the bottom of the tank. Water seeps past the flapper into the bowl, the water level drops slowly, and the fill valve keeps refilling to compensate. Here’s how to confirm. Add 10 drops of food coloring to the tank water, wait 15 minutes without flushing, then check if the bowl water has changed color. Color in the bowl confirms a flapper leak. You need flapper replacement, which costs $5 to $10, not fill valve work. The fill valve constantly running to replace escaping water can actually cause secondary wear on the fill valve, which is why you thought the fill valve was the problem in the first place.
If you’ve addressed all these scenarios and problems still persist, you might be dealing with simultaneous multiple component failures. Toilets older than 15 years with original parts often reach a point where fixing one thing reveals three other failing components. At that stage, evaluate whether a full toilet replacement makes more financial sense than ongoing repairs.
Common Mistakes to Avoid When Repairing Fill Valves

Small mistakes during fill valve repair lead to cracked components, repeat leaks within days, or damage that forces you to replace parts that could have been saved.
Common mistakes to avoid:
- Overtightening plastic nuts and caps causes immediate cracks or creates stress fractures that fail within weeks
- Forgetting to turn off the water supply before starting work results in a flooded bathroom floor the moment you loosen a connection
- Using pliers or wrenches to tighten threaded caps when hand tight is sufficient and prevents thread damage
- Skipping the cleaning step for mineral deposits means new seals won’t seal properly against crusty buildup
- Installing the seal with twists, folds, or improper seating in the cap groove creates channels where water escapes
- Not aligning cap tabs or guides correctly before twisting to lock forces threads and causes cross threading
- Purchasing the wrong valve type without checking compatibility (universal fit works for most, but not all toilets)
- Failing to test with multiple flush cycles after repair because one successful flush doesn’t confirm a lasting fix
Take your time. Follow the steps in order. Most failed DIY fill valve repairs happen because someone rushed through the process or skipped what seemed like unnecessary steps. Spending an extra 5 minutes cleaning mineral deposits properly saves you from having to redo the entire repair in two weeks.
Preventing Future Fill Valve Leaks Through Regular Maintenance

Preventive maintenance costs almost nothing and catches small problems before they turn into active leaks and inflated water bills. Regular checks also extend your fill valve’s lifespan from the typical 5 years to 7 or even 8 years.
A fill valve that gets inspected twice a year and cleaned annually will outlast a neglected valve by several years. Early detection means you replace a $4 seal instead of a $15 valve and paying for wasted water in the meantime.
| Frequency | Maintenance Task | What to Look For |
|---|---|---|
| Every flush | Listen for unusual sounds | Hissing, running water sounds after the tank fills completely |
| Monthly | Quick visual check | Moisture around the valve, unusual water level, discoloration |
| Every 6 months | Detailed inspection | Mineral buildup, seal condition, loose connections, cap tightness |
| Annually | Deep cleaning | Remove and clean cap, descale all components with white vinegar |
| Every 3 to 5 years | Preventive seal replacement | Replace seal even without visible leaks (cheap insurance) |
| Every 5 to 7 years | Full valve replacement | Age based replacement before failure occurs |
Watch for early warning signs between your scheduled inspections. Intermittent hissing that comes and goes, slight moisture on the cap when you touch it, or a water bill that’s crept up by $5 to $10 over a few months all indicate developing problems. Keep a spare seal in your bathroom cabinet. When you spot moisture forming on the cap, you can fix it immediately instead of waiting for a hardware store trip.
Hard water areas require more frequent maintenance. Mineral deposits accumulate faster when your water has high calcium and magnesium content. If you see white crusty buildup on faucets and showerheads, expect the same inside your fill valve. Consider a whole house water softener, which reduces maintenance frequency across all your plumbing fixtures.
Cost Analysis: Repair vs. Replace Your Fill Valve

Understanding the real costs helps you make smart decisions about whether to repair, replace, or call a professional. Water waste from delays often costs more than the repair itself.
| Repair Option | Parts Cost | Time Required | When to Choose |
|---|---|---|---|
| Cap seal replacement only | $3 to $8 | 15 to 20 minutes | Cap and housing intact, leak from seal only |
| Full valve replacement (DIY) | $10 to $15 | 30 to 45 minutes | Cracked housing, multiple worn parts, valve over 7 years old |
| Professional plumber repair | $150 to $250 | 1 to 2 hours | Uncomfortable with DIY, complex issues, time constraints |
| Ignoring the problem | $0 upfront | N/A | Never because it costs $30 to $100+ monthly in wasted water |
A small steady leak from the fill valve top wastes 30 to 50 gallons of water daily. That’s 900 to 1,500 gallons per month, which translates to $20 to $40 added to your water bill depending on your local rates. Over six months of ignoring the problem, you’ll pay $120 to $240 in wasted water. Ten times the cost of a $15 valve replacement. The return on investment is immediate. Fix it this weekend and your next water bill drops back to normal.
Quality brand valves like Fluidmaster and Korky cost about the same as generic options ($10 to $15) but last 2 to 3 years longer. That extended lifespan means fewer repairs over the life of your toilet. Most quality valves include a 5 year warranty covering defects and premature failure. Keep your receipt in a file with other home maintenance records. If the valve fails within the warranty period, you can get a free replacement (though you’ll still need to install it yourself or pay for labor).
When to Call a Professional Plumber Instead of DIY

Some situations exceed DIY capability or risk causing more damage if you proceed without professional expertise. Recognizing these scenarios saves you from turning a $15 fix into a $500 disaster.
When to call a plumber:
- Visible cracks in the toilet tank porcelain or bowl structure (attempting repairs risks shattering the entire fixture)
- Stuck or corroded shutoff valve that won’t turn (forcing it can break the valve and flood your bathroom)
- Low water pressure affecting every fixture throughout your entire home (indicates supply line problems beyond a single toilet)
- Persistent leaking after correctly replacing the valve and all related components according to instructions
- Water pooling on the bathroom floor from an unknown source you can’t trace
- Multiple toilet components failing at the same time (flapper, fill valve, and tank bolts all leaking)
- Discomfort working with water shutoff procedures or plumbing connections (there’s no shame in hiring expertise)
- Toilet wobbles or shows signs of floor damage around the base (indicates wax ring or floor structure problems)
- Leaks accompanied by sewage odors or discolored water (suggests drainage system issues)
Professional service calls for fill valve replacement typically cost $150 to $250 including parts and labor. Plumbers warranty their work for 30 to 90 days, which means if the repair fails during that window, they’ll return and fix it at no additional charge. For complex diagnostic situations where you can’t identify the actual problem source, paying for expert diagnosis often saves money compared to replacing multiple parts through trial and error.
Choose established local plumbers with current licensing and liability insurance. Check online reviews focusing on punctuality, cleanliness, transparent pricing, and follow up service. A good plumber will explain what failed, why it failed, and what you can do to prevent future problems.
Understanding Different Fill Valve Types and Brands

Understanding valve variations helps you select appropriate replacement parts and recognize what you’re working with when you remove the tank lid. Fill valves have evolved significantly over the past 40 years.
Float Cup Fill Valves (Most Common)
This vertical design features an adjustable float cup that slides up and down the valve shaft as water level changes. The cup rises with the water, gradually closing the valve when the tank is full. Float cup valves run quietly, adjust easily by moving the cup higher or lower on the shaft, and fit universally in most toilets manufactured since 1990. The Fluidmaster 400A is the industry standard, installed in millions of homes and available at every hardware store.
Float Ball and Arm Assembly (Older Style)
This horizontal design uses a hollow ball attached to a metal or plastic arm extending from the valve body. As the tank fills, the ball floats upward, raising the arm until it shuts off water flow. You’ll find these in toilets manufactured before the 1990s. They operate louder than float cup designs, require more horizontal space inside the tank, and the ball can corrode or crack over time. If you have this style, consider converting to a modern float cup valve during replacement.
Pressure Assisted and Specialty Valves
Commercial grade toilets and residential pressure assisted models require specific valve types designed to handle higher pressures and rapid fill cycles. Dual flush toilets may have compatibility requirements tied to the flush mechanism. For these specialty systems, match the original manufacturer’s specifications rather than installing a universal valve. Check your toilet’s model number and order the correct OEM replacement.
When selecting a replacement valve, consider these brands:
Fluidmaster: Industry standard, reliably performs for 5 to 7 years, replacement parts are available everywhere, universal fit covers about 95% of residential toilets.
Korky: QuietFill technology reduces fill noise significantly, premium build quality justifies the $3 to $5 price increase, excellent customer support.
American Standard: OEM parts specifically engineered for American Standard toilets, ensures perfect fit and optimal performance.
Mansfield: Designed for Mansfield toilet models which sometimes have unique mounting configurations.
Universal/generic brands: Budget option at $8 to $10, verify fit before purchasing, shorter lifespan of 3 to 5 years.
Signs Your Fill Valve Problem Might Indicate Larger Plumbing Issues
An isolated fill valve failure is normal wear and tear. Components age, seals deteriorate, and replacement is just part of home ownership. But when you see multiple symptoms together or patterns affecting several fixtures, the fill valve leak might be pointing to bigger problems in your home’s plumbing system.
Whole home water pressure affects every individual fixture including your toilet’s fill valve. Low pressure forces the valve to work harder and take longer to fill the tank, accelerating wear. High pressure (above 80 PSI) can force water past seals that would otherwise hold properly. If your toilet fill valve is leaking and you’ve also noticed weak shower pressure or faucets that barely trickle, the root cause isn’t the toilet. It’s your home’s supply pressure.
Red flags indicating larger issues:
- Multiple toilets in your home experiencing similar problems at the same time (suggests supply line issues or pressure problems)
- Reduced water pressure at all fixtures including sinks, showers, and outdoor spigots (indicates main line restriction or pressure regulator failure)
- Discolored, rusty, or cloudy water appearing in the toilet tank (signals corroded pipes upstream)
- Frequent recurring leaks despite installing new, quality replacement valves correctly (points to excessive pressure or water quality issues)
- Unusual sounds in the walls when the toilet fills, such as banging or hammering (indicates water hammer from pressure spikes)
- Fluctuating water temperature at sinks and showers during toilet fill cycle (suggests undersized supply lines or cross connection issues)
- Visible corrosion on multiple plumbing connections throughout the bathroom (indicates age related deterioration affecting entire system)
If you’re seeing three or more of these red flags, schedule a whole home plumbing inspection rather than just fixing the toilet. Homes over 30 years old with original galvanized steel or early copper plumbing often reach a point where the entire system needs evaluation. Addressing root causes like insufficient pressure regulation or corroded main lines prevents you from replacing the same toilet components repeatedly while the underlying problem continues damaging everything connected to your water supply.
Final Words
A toilet fill valve leaking from top usually means a worn cap seal or loose threaded cap. Both are simple fixes.
Tighten the cap first. If that doesn’t work, replace the seal for under $10.
If the housing is cracked or the valve is over seven years old, swap the whole thing out. It takes less than an hour and prevents water waste that quietly drives up your bill.
Check your work with a few flush cycles. If everything holds, you’re done.
FAQ
Q: Why is the top of my fill valve leaking?
A: The top of your fill valve is leaking because the cap seal or O-ring has worn out, the threaded cap is loose, or mineral deposits prevent proper sealing. Less commonly, the valve housing may be cracked. Most top leaks result from natural seal deterioration over time and require a simple cap seal replacement costing $3 to $8.
Q: How do you fix a toilet leaking from the top?
A: To fix a toilet leaking from the top, start by hand-tightening the threaded cap clockwise. If that doesn’t work, remove the cap, clean any debris from the seal area, and reseat it. If the leak continues, replace the cap seal or O-ring, which takes about 15 minutes and costs $3 to $8 for parts.
Q: Why is water coming out of the top of my fill valve during the fill cycle?
A: Water coming out of the top of your fill valve during the fill cycle indicates debris lodged under the cap seal, a worn O-ring, or loose cap threads. This happens when the seal can’t maintain pressure during the refill process. Cleaning the seal area and replacing the O-ring usually solves the problem without needing a full valve replacement.
Q: How much does a plumber charge to replace a toilet fill valve?
A: A plumber charges $150 to $250 to replace a toilet fill valve, which includes labor and parts. DIY replacement costs only $10 to $15 for a new valve and takes 30 to 45 minutes. Professional service makes sense when you’re uncomfortable with DIY work or dealing with stuck shutoff valves or complex issues.
Q: Can you replace just the seal on a fill valve instead of the entire valve?
A: You can replace just the seal on a fill valve if the housing and threads are intact. This costs $3 to $8 and takes 15 minutes compared to full valve replacement at $10 to $15 and 30 to 45 minutes. Replacing only the seal works for 90 percent of top leaks and saves money when the valve structure remains sound.
Q: How long does a toilet fill valve typically last?
A: A toilet fill valve typically lasts 5 to 7 years with normal use and proper maintenance. Hard water areas may shorten this lifespan to 3 to 5 years due to mineral buildup. Quality brands like Fluidmaster and Korky often exceed the average lifespan when maintained regularly with annual cleaning and periodic seal replacement.
Q: What tools do I need to fix a leaking fill valve?
A: To fix a leaking fill valve, you need an adjustable wrench or pliers, bucket and towels, flashlight, old toothbrush for cleaning, and a screwdriver. For parts, get a cap seal or O-ring kit, plumber’s thread tape, and white vinegar for cleaning mineral deposits. Keep a complete replacement valve on hand if the housing is cracked.
Q: How can I tell if my fill valve needs complete replacement or just a seal?
A: Your fill valve needs complete replacement if you see cracks in the housing or cap, the valve is over 7 years old, or multiple components show wear. It needs only a seal replacement if the cap and housing look intact, the leak appears only at the top during fills, and simple tightening doesn’t stop the drip.
Q: What happens if I ignore a leaking fill valve?
A: If you ignore a leaking fill valve, you’ll waste 30 to 50 gallons of water daily, increasing your water bill by $20 to $40 monthly. Over time, the constant moisture can damage tank components, promote mold growth, and potentially lead to floor damage if the leak worsens. A $3 to $15 repair prevents hundreds in wasted water costs.
Q: How do I adjust the water level after replacing a fill valve?
A: To adjust the water level after replacing a fill valve, turn the adjustment screw clockwise to lower or counterclockwise to raise water for screw-type floats. For clip-type float cups, squeeze the clip and slide the cup up or down the valve shaft. Set the final water level ½ to 1 inch below the overflow pipe top.
Q: Why does my toilet still run after I replaced the fill valve?
A: Your toilet still runs after replacing the fill valve because the problem is actually the flapper seal, not the fill valve. The flapper lets water seep from the tank into the bowl, triggering the fill valve to constantly refill. Test this by adding food coloring to the tank and checking if bowl water changes color within 15 minutes without flushing.
Q: Can hard water cause fill valve leaks?
A: Hard water can cause fill valve leaks by depositing minerals and calcium buildup on cap threads and seal surfaces, preventing proper sealing. These deposits block the seal from making complete contact. Hard water areas require more frequent maintenance, including annual cleaning with vinegar and seal replacement every 3 years instead of 5.
Q: What’s the difference between universal and toilet-specific fill valves?
A: Universal fill valves fit most standard toilets and cost $10 to $15, offering convenience and wide availability. Toilet-specific fill valves match your exact toilet model, ensuring optimal performance for specialty toilets like pressure-assisted or dual-flush systems. Universal valves work fine for standard toilets, but matching the original model guarantees proper fit and function.