
Your toilet’s been running nonstop for weeks, and you’re probably convinced you need a whole new fill valve. Actually, that $80 valve replacement you’re dreading might just need a $4 rubber disk called a diaphragm. This thin seal sits inside your fill valve and stops water flow when your tank’s full. When it wears out or gets caked with minerals, your toilet runs constantly and wastes gallons every day. The good news? Swapping it takes about 20 minutes, requires basic tools you already own, and stops that water waste immediately.
Essential Tools and Parts for Your Diaphragm Replacement

Having everything ready before you start saves you from dripping water panic and mid-project runs to the store. This is a straightforward repair, but it moves faster when your tools are within reach and your replacement parts are confirmed compatible.
Required Tools and Materials:
-
Adjustable wrench. Used for loosening the mounting nut under the tank and disconnecting the water supply line from the threaded shank.
-
Flathead screwdriver. Needed for popping off clips that secure the valve cap and prying out the old diaphragm from its seating area.
-
Replacement diaphragm or repair kit. The main component you’re installing, often packaged with gasket replacement parts and sometimes a new spring mechanism.
-
Plastic bucket. Catches water drainage when you disconnect the supply line and helps contain any residual drips from the valve body.
-
Towels or sponges. Essential for soaking up water from the tank bottom after flushing and for cleanup around the work area.
-
Small wire brush. Perfect for scrubbing away mineral deposits from the valve body interior and diaphragm seating surface.
-
White vinegar. Dissolves calcium buildup effectively without damaging plastic or rubber toilet components.
-
Flashlight. Lets you see inside the valve body clearly to inspect for cracks, debris, or damage before installing the new diaphragm.
Finding the right replacement diaphragm matters more than you’d think. Most hardware store options fall into two categories: universal fit diaphragms that work across multiple brands, and brand specific parts designed for Fluidmaster or Korky valves. Universal options usually cost $3 to $5 and fit standard ballcock assembly designs, but checking your valve manufacturer before buying prevents return trips. Brand specific parts offer better compatibility, especially for newer fill valve models with proprietary sizing. OEM parts from the original manufacturer typically cost $1 to $2 more than aftermarket versions but guarantee exact fit. To identify the correct diaphragm size, look for model numbers stamped on the valve body or measure the diameter of your existing diaphragm. Most are 1.5 or 2 inches.
You’ll find replacement parts at any hardware store, Home Depot, or Lowes in the plumbing supplies aisle. Expect to pay $3 to $8 for a diaphragm alone or $8 to $12 for a complete repair kit that includes washers, gaskets, and clips. Online purchase gives you more selection but adds shipping time, so local pickup makes sense for urgent repairs.
Identifying Your Fill Valve Type and Diaphragm Compatibility
Knowing which type of fill valve you have determines what replacement parts will actually work and whether diaphragm only replacement is even an option for your toilet.
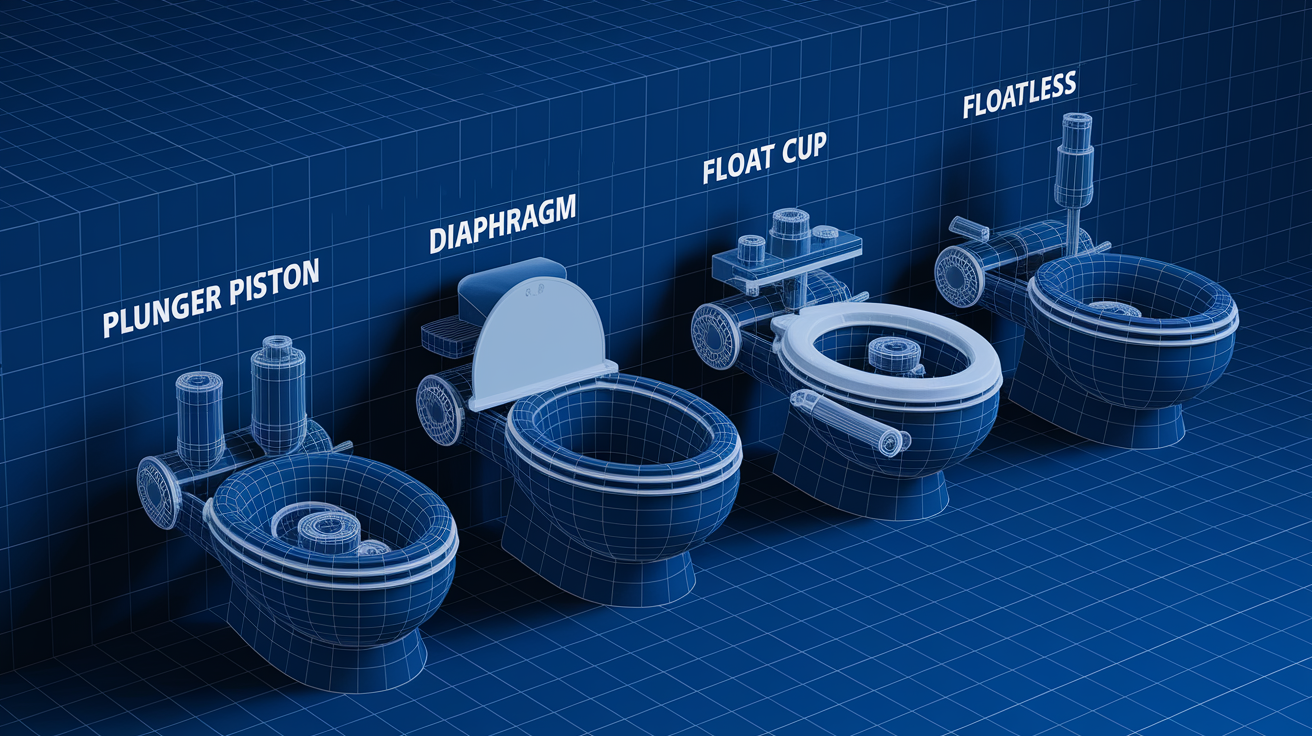
| Valve Type | Key Features | Diaphragm Location | Common Brands |
|---|---|---|---|
| Plunger/Piston | Brass or plastic cup with rubber gasket, vertical rod | Under piston assembly at valve base | Older universal models, various manufacturers |
| Diaphragm | Rubber disk inside bonnet cap, float arm | Inside cap at top of valve body | Fluidmaster 400 series, Korky QuietFill |
| Float Cup | Plastic cup slides on valve shaft | Inside sealed cartridge (not user replaceable) | Fluidmaster 400A, modern universal valves |
| Floatless | No visible float, pressure sensing | Integrated sensor (sealed unit) | Commercial toilets, Sloan, Zurn |
The diaphragm style ballcock assembly is the most common type where replacing just the rubber disk separator makes sense. This design regulates water flow by pressing a thin rubber diaphragm against the inlet opening when water reaches the correct level. As the float arm rises, it pushes the diaphragm down to seal off water entry. When this rubber disk wears out, cracks, or gets stiff from mineral buildup, it stops sealing properly and your toilet keeps running. The beauty of this design is that you can access and replace the diaphragm without removing the entire valve from the tank.
Entry configuration affects how you’ll work on the valve. A bottom entry valve has the supply line connecting underneath the tank at the base of the threaded shank, which is standard on modern toilets and gives you easier access. A side entry valve connects through the tank wall, more common on older toilets, and requires working in tighter spaces. This entry point location doesn’t change the diaphragm replacement steps, but it does affect how you’ll disconnect and reconnect the supply line. Older toilets with side entry often have brass components that may have corroded nuts, so plan for potential stuck connections.
Fluidmaster and Korky are the two dominant brands you’ll encounter. Fluidmaster 400 series valves use a specific diaphragm design that’s widely available as replacement part number 242. Korky models often use compatible universal fit diaphragms, but their QuietFill series has a proprietary seal that requires the correct Korky part number. These brands aren’t typically interchangeable at the diaphragm level even though the overall valve bodies look similar. Using the wrong brand’s diaphragm can result in improper sealing or the part not fitting into the valve body cavity at all.
Finding your model number takes the guesswork out. Look for numbers stamped into the plastic of the valve body itself, usually near the base or on the threaded shank that extends through the tank bottom. If the stamping has worn off, measure your diaphragm diameter and note the valve’s overall design features. Bringing your old diaphragm to the hardware store lets staff match it visually, but having the model number guarantees you get a replacement kit that fits perfectly on the first try.
Complete Step by Step Diaphragm Replacement Process

Spread a towel on the floor around the toilet base before starting. Water will drip during disconnection, and protecting your bathroom floor beats cleaning up puddles later.
Complete Replacement Procedure:
-
Locate and turn shut off valve clockwise. This valve is behind the toilet at the wall, where the supply line connects to the wall plumbing. Turn it all the way until it stops.
-
Flush toilet to drain water from toilet tank. Hold the handle down for a full flush to remove as much water as possible from the tank.
-
Use sponge or towel to remove remaining water from tank bottom. There’s always water left after flushing. Soak it up completely to prevent spills when you open the valve.
-
Place bucket under water supply line connection. Position it directly under where the supply line connects to the threaded shank at the tank bottom to catch dripping water.
-
Use adjustable wrench to disconnect supply line from valve shank. Turn the coupling nut counterclockwise. You’ll get some water drainage here even after the tank is empty.
-
Remove fill valve cap by turning counterclockwise or releasing clips. Some caps twist off, others have plastic clips you squeeze. The cap is the top portion of the valve body.
-
Lift float cup assembly upward to expose diaphragm housing. The float and its attached mechanism slide up on the valve shaft, revealing the rubber seal underneath.
-
Use flathead screwdriver to carefully pry out old rubber seal/diaphragm. Work gently around the edges. The diaphragm sits in a shallow cavity and may be stuck from mineral buildup.
-
Inspect valve body cavity for debris and damage. Look for cracks in the plastic seating area or pieces of deteriorated rubber. A damaged valve body means you need full valve replacement.
-
Clean diaphragm seating area with vinegar dampened cloth and wire brush. Scrub away calcium buildup and mineral deposits until the surface is smooth. This ensures proper sealing with the new diaphragm.
-
Dry all surfaces completely before proceeding. Any moisture or loose debris will prevent the new diaphragm from seating correctly.
-
Position new rubber seal with smooth side facing downward. The diaphragm has a smooth sealing surface on one side. This side must face down toward the inlet opening.
-
Press diaphragm firmly into valve body cavity ensuring edges seat completely. Work around the perimeter, pushing the rubber into the groove. There should be no raised edges or gaps.
-
Reattach spring mechanism over diaphragm center. If your valve has a small spring, it sits on top of the diaphragm center to help maintain sealing pressure.
-
Lower float cup assembly back into position and secure valve cap. Reverse the removal process, making sure the cap threads or clips engage fully.
Proper refill tube positioning prevents siphoning issues that can drain your tank slowly. The refill tube is the small flexible tube that runs from the fill valve to the overflow tube. After reassembly, make sure this tube aims into the overflow tube opening but stays above the water level. Use the clip included in your replacement kit to attach the refill tube to the top edge of the overflow pipe. The tube shouldn’t hang down into standing water or rest on the tank bottom. Float cup height determines when the valve shuts off. Position it so water stops filling when the level reaches 1 inch below the top of the overflow tube.
Cleaning the valve body interior with vinegar solution before installing the new diaphragm extends the repair’s lifespan. Mix equal parts white vinegar and water, dampen your cloth, and scrub inside the valve body cavity where the diaphragm sits. Use the wire brush on stubborn calcium buildup, working carefully to avoid scratching the plastic seating surface. Mineral deposits create an uneven surface that prevents the rubber seal from making complete contact, so thorough cleaning matters as much as the new diaphragm itself.
Take a moment to inspect the old diaphragm once it’s out. Look for cracks radiating from the center, tears around the edges, stiffness when you flex it, and dark discoloration or chalky white buildup. These signs confirm the diaphragm was your problem source. A diaphragm that looks perfectly fine might indicate your issue is elsewhere, like a faulty flapper or flush valve.
Testing Performance and Adjusting Water Level

Open the shut off valve slowly while watching every connection point. Turn it counterclockwise just a quarter turn at first, pause, check for drips at the mounting nut under the tank, at the supply line coupling, and around the valve seal area inside the tank. If everything stays dry, continue opening the valve fully.
Water Level Adjustment Steps:
-
Slowly open shut off valve while watching for leaks at all connections. Any drips mean you need to tighten that connection or recheck the diaphragm installation.
-
Observe current water level after tank refills completely. Let the valve cycle through a full fill and automatic shutoff. Check where the water level sits relative to the overflow tube.
-
Locate adjustment mechanism, screw on top or clip on float rod. Most diaphragm valves have an adjustment screw on the valve cap or a clip that slides on the float rod.
-
Turn adjustment screw clockwise to lower, counterclockwise to raise water level. Make small adjustments, a quarter turn at a time. For clip style adjustments, pinch and slide the clip up to raise the level, down to lower it.
-
Flush and observe new water level position relative to overflow tube. Each adjustment changes the level by roughly a quarter inch. One full flush cycle shows you the result.
-
Repeat adjustments until water stops 1 inch below overflow tube. This standard measurement prevents overflow while maintaining adequate flush performance.
Water level directly affects how well your toilet flushes and how much water each flush uses. Too low and you get weak flushes that don’t clear waste effectively. Too high and water flows into the overflow tube constantly, wasting gallons per hour. The 1 inch below overflow guideline balances flush power against water conservation. You’ll also hear the difference. Proper level means the fill valve shuts off with a clean stop, no hissing or running water sound.
Test multiple flush cycles to verify everything works consistently. Flush at least three times in a row. Each time, check that the refill speed is reasonable, 60 to 90 seconds to full, that the valve shuts off completely within 10 seconds of reaching the proper level, and that you don’t hear running water or a hissing sound between flushes. If performance varies between cycles, your diaphragm might not be seated correctly or the adjustment needs fine tuning.
Some fill valves include a flow restrictor or have an adjustment screw that controls inlet water pressure. If your refill is too fast and creates loud splashing or water hammer sounds in your pipes, you can dial back the flow. This adjustment is usually a small screw near the inlet valve opening. Turning it slightly restricts flow, reducing noise but extending refill time. Balance fast fill against noise reduction based on what matters more in your situation.
Signs your repair succeeded are obvious when you know what to listen for. The valve should operate quietly, with just the sound of water flowing into the tank. It should shut off completely within 10 seconds once the water reaches the correct level. Total refill time after a flush should land between 60 and 90 seconds. No hissing, no humming, no constant water running. If you notice any of these sounds, the diaphragm needs reseating or your issue involves other toilet components.
Diagnosing Issues: When Diaphragm Replacement Is the Solution

A simple diagnostic test tells you whether your fill valve needs attention. Lift the toilet tank lid and watch what happens after a flush. Listen carefully for sounds while the tank refills and after it stops. If you hear hissing or see water flowing into the overflow tube after the tank fills, you’ve likely got a diaphragm issue.
Combined Diagnostic and Decision Factors:
Constant water running into overflow tube after tank fills. Classic diaphragm failure where the rubber disk no longer seals the inlet opening properly.
Weak or slow refill after flush taking over 2 minutes. Worn seal that’s partially blocking water flow or not opening fully due to stiffness.
Persistent hissing or humming noise from tank. Improper sealing that allows water to leak past the diaphragm continuously.
Visible water seepage around valve seal area. Gasket deterioration at the diaphragm interface or valve cap connection.
Age of existing fill valve. Under 3 years suggests diaphragm replacement, over 5 years suggests full valve replacement. Older valves often have additional wear issues beyond just the diaphragm.
Extent of mineral deposits and calcium buildup on valve components. Heavy buildup throughout the valve indicates cleaning alone won’t solve the problem.
Condition of other valve parts, float cup, clips, threaded shank. Cracked or brittle plastic parts mean the whole valve is near end of life.
Cost considerations. $3 to $8 for diaphragm versus $15 to $25 for complete valve. When the valve body is otherwise sound, diaphragm only replacement makes financial sense.
Diaphragm deterioration happens gradually through normal use and water quality exposure. A typical diaphragm lasts 3 to 5 years before the rubber loses flexibility and develops cracks. Hard water accelerates wear significantly. Calcium buildup forms on the diaphragm surface, preventing it from creating a water tight seal even when it’s not cracked. Mineral deposits also coat the valve body seating area, creating an uneven surface. Water pressure fluctuations stress the diaphragm each time it opens and closes, eventually causing material fatigue at the center point where pressure concentrates.
Delaying this repair costs you more than the parts and time you’re avoiding. A running toilet wastes 2 to 3 gallons per hour, which adds up to 50 to 70 gallons daily. Over a year, that wasted water increases your bill by $50 to $200 depending on local water rates. The constant water flow also wears on your flapper, shortening its life. If the overflow tube can’t keep up with the flow rate, water can leak from the tank onto your bathroom floor, risking damage to flooring and subfloor. These secondary issues make a $5 diaphragm problem into a much larger repair.
When diaphragm replacement alone is sufficient versus needing full valve replacement depends mainly on the overall valve condition and age. If your fill valve is under 3 years old, the valve body and other components are likely fine, so replacing just the diaphragm makes sense. Between 3 and 5 years, inspect the float cup for cracks, check that clips aren’t brittle, and look at the threaded shank for corrosion. If these parts look good, diaphragm replacement should work. Over 5 years old, or if you see cracks in the valve body plastic or heavy mineral deposits throughout, replacing the complete valve is the better long term solution.
Resolving Post Installation Problems
Sometimes the new diaphragm doesn’t completely solve your toilet issue, or you run into new problems during reassembly. This doesn’t mean you did the repair wrong. It means other components need attention too.
| Problem | Likely Cause | Solution |
|---|---|---|
| Water still running constantly | Flapper not sealing properly | Inspect and replace flapper |
| Slow refill persists | Clogged inlet valve screen | Remove and clean debris from valve inlet |
| Hissing continues | Improper refill tube positioning | Reposition refill tube above water level |
| Water leaking from tank base | Loose mounting nut or damaged washers | Tighten nut or replace tank to bowl washers and gaskets |
| Weak flush performance | Incorrect water level setting | Raise water level closer to overflow tube |
| Whistling or humming noise | Water pressure too high | Install pressure reducer or adjust inlet valve restrictor |
When water continues running even with a new diaphragm, the problem often involves other toilet components entirely. The flapper at the tank bottom might be worn, cracked, or misaligned, allowing water to leak from the tank into the bowl. This triggers the fill valve to run constantly trying to maintain water level. The flush valve seat where the flapper rests could be rough or damaged. An anti siphon valve, if your toilet has one, might be malfunctioning and creating a pressure issue that prevents proper shutoff. Test by pressing down on the flapper manually. If the running stops, replace the flapper. If pressing the flapper makes no difference, your inlet valve or diaphragm installation needs another look.
Persistent leaking toilet scenarios that don’t respond to diaphragm replacement signal that full valve replacement is the right next step. If you’ve installed a new diaphragm correctly, cleaned all surfaces, adjusted the water level properly, and water still flows into the overflow tube constantly, the valve body itself may be cracked or warped. Hairline cracks in plastic valve bodies aren’t always visible but prevent proper sealing. Another sign you need complete replacement is when the threaded shank has corroded where it contacts the mounting nut, creating a path for water to seep. At this point, professional installation might make sense if you’re not comfortable with removing and replacing the entire fill valve assembly.
For older toilets versus modern toilets, the repair or replace decision weighs differently based on overall condition. An older toilet with original brass components might have corroded threads, making removal and reinstallation risky. If other tank components like the flush valve and mounting hardware are also near the end of their lifespan, replacing everything at once prevents repeated repairs. Modern toilets with all plastic components make individual repairs like diaphragm replacement more worthwhile since other parts are likely still in good condition.
DIY vs Professional Repair: Cost Analysis

The financial breakdown for this repair is straightforward. Replacing just the diaphragm costs $3 to $8 for the part and takes about 30 minutes once you’ve done it. A complete fill valve replacement runs $15 to $25 for parts and takes 45 minutes including tank disconnection. Hiring a plumber for this job costs $150 to $300, which includes parts, labor, and the service call fee. That price range reflects regional differences and whether you’re calling during business hours or for emergency service.
DIY Approach Factors:
Skill level required and learning curve for first time DIY plumbing. This repair is beginner friendly with clear visual confirmation at each step.
Tools investment if not already owned, one time $15 to $30. An adjustable wrench and screwdriver are useful for many home repairs beyond just toilets.
Time commitment including shopping trip and installation. Plan for 90 minutes total your first time, including the hardware store run.
Risk of improper installation requiring professional correction. Following instructions carefully minimizes this risk, but overtightening or missing a step can create leaks.
Confidence in diagnosing the actual problem correctly. If you’re unsure whether the diaphragm is really your issue, professional diagnosis prevents buying wrong parts.
Availability of plumbing supplies locally. Same day repair depends on having a hardware store nearby with the right parts in stock.
Addressing this promptly creates significant long term cost savings beyond the repair itself. A toilet that runs constantly because of a worn diaphragm wastes 2 to 3 gallons of water per hour. Over a month, that’s 1,500 to 2,200 gallons. Depending on your local water rates, you’re looking at $15 to $30 monthly in wasted water costs, adding up to $180 to $360 annually. A $5 diaphragm fixes this immediately. Delaying the repair also risks secondary damage to other bathroom fixtures. Constant moisture around the toilet base from condensation or minor leaks can rot subfloor, damage tile grout, and create conditions for mold growth. These repairs cost hundreds to thousands compared to the simple diaphragm fix.
Warranty considerations and durability expectations help you decide between parts. Most replacement diaphragms carry no formal warranty but are inexpensive enough that this doesn’t matter much. Complete fill valve kits often include a 5 year manufacturer warranty covering defects. A new diaphragm typically lasts 3 to 5 years before you’ll need to replace it again. A complete valve replacement lasts 5 to 7 years under normal conditions. Professional service makes sense for older toilets where you’re dealing with corroded nuts and the risk of cracking porcelain. It’s also worth considering for bottom entry valve or side entry valve configurations if the shutoff valve is stuck or you’re uncomfortable working in tight spaces. If you’re replacing diaphragms on multiple toilet models throughout your home, a plumber can knock out all of them in one service call, which is more efficient than DIY-ing each one separately.
Maintenance Schedule to Prevent Future Diaphragm Failure
Regular attention to your toilet tank components catches problems early, prevents emergency repairs, and makes each component last longer. Proactive maintenance takes just minutes but protects your investment in your home’s plumbing system. This approach supports water conservation by ensuring your toilet operates efficiently without waste, and proper bathroom fixtures care maintains home value by preventing water damage.
Preventive Maintenance Tasks:
-
Monthly. Flush test and listen for unusual sounds, hissing, humming. A quick check when you’re cleaning the bathroom catches developing issues before they waste water.
-
Quarterly. Inspect toilet tank interior for mineral buildup or rust. Lift the lid and look for white calcium deposits on components or brown rust stains on metal parts.
-
Quarterly. Check water level consistency and adjust if needed. Verify the level still sits 1 inch below the overflow tube opening.
-
Semi annually. Clean valve body exterior and remove calcium deposits with vinegar. Wipe down visible surfaces with a vinegar dampened cloth to prevent buildup from reaching critical sealing areas.
-
Annually. Inspect diaphragm condition by removing valve cap. Pop the cap off and look at the rubber disk for early signs of cracking or stiffness before failure occurs.
-
Every 5 years. Replace entire fill valve assembly regardless of apparent condition. Plastic components degrade over time even without obvious damage. Scheduled replacement prevents unexpected failures.
Water quality has a direct impact on how often you’ll need to perform cleaning parts routines. Hard water areas with high mineral content require more frequent inspection and cleaning. Calcium buildup and mineral deposits form faster on rubber seals and plastic surfaces, reducing component lifespan significantly. If you notice white crusty deposits forming on your faucet aerators or showerhead, you have hard water and should move to monthly cleaning instead of semi annually. A whole house water softener reduces these deposits dramatically, often extending fill valve and diaphragm life by 2 to 3 years. For homes without softeners, vinegar treatment during your regular maintenance schedule dissolves existing buildup before it hardens enough to damage sealing surfaces.
Set up a maintenance schedule reminder system to keep on track. Add toilet maintenance to your phone calendar as a recurring task, or note it on your home maintenance checklist alongside furnace filter changes and other routine items. Keep a simple log of when you complete each task and what you found. Note the date you installed the current diaphragm or replaced the fill valve. This record tells you when scheduled replacement is due and helps you spot patterns if certain components fail faster than expected.
Even with good preventive measures, you’ll eventually see signs that component replacement is imminent rather than maintenance being sufficient. Visible deterioration of rubber seal material shows as cracks, permanent creases, or sections that stay compressed instead of flexing back. Dark discoloration of the rubber or a tacky, sticky texture indicates chemical breakdown. If you’re cleaning mineral deposits quarterly but they return within weeks, buildup is outpacing your maintenance efforts and replacement is coming. When you’ve addressed persistent issues multiple times despite cleaning and your fill valve is approaching the 3 to 5 year lifespan threshold, scheduled replacement prevents the inconvenience of unexpected failure.
Final Words
The toilet fill valve diaphragm replacement you just completed should give you years of quiet, reliable performance.
You’ve got the tools, the steps, and the troubleshooting knowledge to handle this repair confidently.
Regular maintenance and quick attention to early warning signs will keep your toilet running efficiently and save you money on your water bill.
If something still feels off after your repair, don’t hesitate to double-check the valve seal and refill tube positioning. Most issues resolve with a simple adjustment.
You’ve protected your home and avoided an expensive plumber visit. That’s a solid win.
FAQ
How do you replace a toilet fill valve diaphragm?
To replace a toilet fill valve diaphragm, turn off the water supply valve behind the toilet, flush to drain the tank, remove the fill valve cap by turning it counterclockwise or releasing clips, pry out the old rubber diaphragm with a flathead screwdriver, clean the valve body cavity with vinegar, press the new diaphragm firmly into place with the smooth side facing down, and reassemble the valve cap and float assembly.
What causes a diaphragm on a fill valve to fail?
A diaphragm on a fill valve fails due to mineral deposits and calcium buildup from hard water, normal wear from repeated opening and closing cycles, exposure to fluctuating water pressure, and age-related deterioration of the rubber material. Most diaphragms wear out after three to five years of regular use, with hard water accelerating the breakdown process.
What is the life expectancy of a toilet fill valve diaphragm?
The life expectancy of a toilet fill valve diaphragm is typically three to five years under normal water conditions. Hard water areas with high mineral content reduce this lifespan, while homes with water softeners may see diaphragms last closer to the five-year mark. Replacing the entire fill valve assembly every five years is recommended as preventive maintenance.
How much does a plumber charge to replace a toilet fill valve?
A plumber typically charges between $150 and $300 to replace a toilet fill valve, including parts and labor. This covers the service call, the new valve assembly, and installation time of roughly 45 minutes. DIY replacement costs only $15 to $25 for the parts if you handle the installation yourself.
When should you replace the diaphragm versus the entire fill valve?
You should replace just the diaphragm when the valve body is in good condition, the valve is less than three years old, and there’s no extensive mineral buildup on other components. Replace the entire fill valve if it’s over five years old, shows heavy calcium deposits, has cracks in the valve body, or multiple parts are worn beyond just the diaphragm.
What tools do you need to replace a fill valve diaphragm?
You need an adjustable wrench for loosening the mounting nut, a flathead screwdriver for removing clips and the diaphragm, a replacement diaphragm or repair kit, a plastic bucket to catch water, towels for cleanup, a small wire brush for cleaning mineral deposits, white vinegar for dissolving calcium buildup, and a flashlight for inspecting the valve interior.
How do you know if the diaphragm is the problem versus other toilet parts?
The diaphragm is likely the problem if you hear constant water running into the overflow tube after the tank fills, the tank refills slowly taking over two minutes, or there’s a persistent hissing sound from the fill valve area. If replacing the diaphragm doesn’t fix a running toilet, the flapper or flush valve may need attention instead.
Can you use universal diaphragms for all fill valve brands?
You can use universal diaphragms for many fill valve models, but some brands like Fluidmaster and Korky have specific diaphragm designs that work best with their valve bodies. Check the valve body or threaded shank for model numbers before purchasing, and when possible, match the replacement diaphragm to the original manufacturer for best compatibility and proper sealing.
How do you adjust the water level after replacing the diaphragm?
After replacing the diaphragm, adjust the water level by locating the adjustment screw on top of the fill valve or the clip on the float rod. Turn the screw clockwise to lower the water level or counterclockwise to raise it, aiming for water that stops one inch below the top of the overflow tube. Flush and check the level, repeating adjustments until correct.
What are signs you need to replace the fill valve diaphragm?
Signs you need to replace the fill valve diaphragm include constant water running into the overflow tube, slow tank refill taking over two minutes, a persistent hissing or humming noise from the tank, visible water seepage around the valve seal area, or water level that won’t maintain the correct height. These symptoms indicate the rubber seal isn’t closing properly.
Is it worth doing diaphragm replacement yourself versus hiring a plumber?
Diaphragm replacement is worth doing yourself if you’re comfortable with basic home improvement tasks, have the needed tools, and can follow step-by-step instructions. You’ll save $140 to $290 in labor costs for a repair that takes about 30 minutes. Hire a plumber if you have side entry valves, multiple toilets needing service, or lack confidence in DIY plumbing.
How often should you inspect the fill valve diaphragm?
You should inspect the fill valve diaphragm annually by removing the valve cap and checking the rubber seal for cracks, stiffness, or discoloration. Perform monthly flush tests listening for unusual sounds, and quarterly checks of the tank interior for mineral buildup. Homes with hard water benefit from semi-annual inspections to catch deterioration early.