
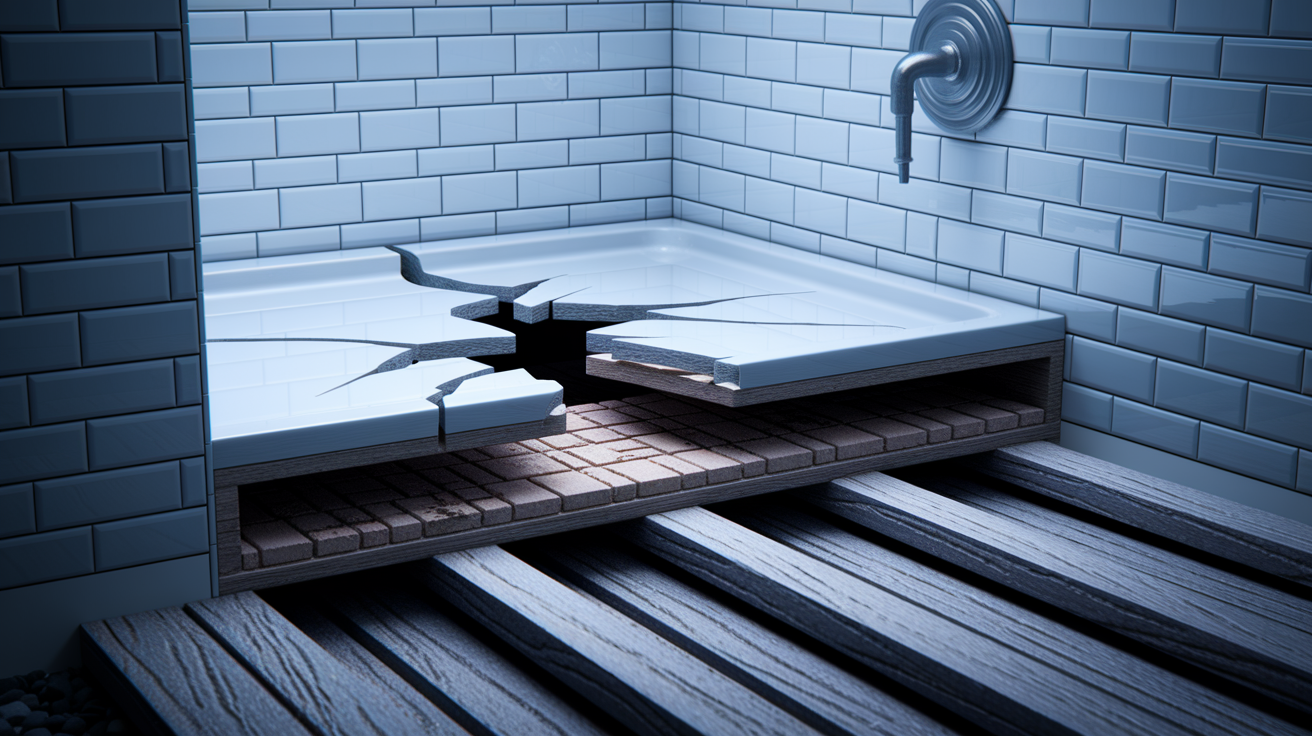
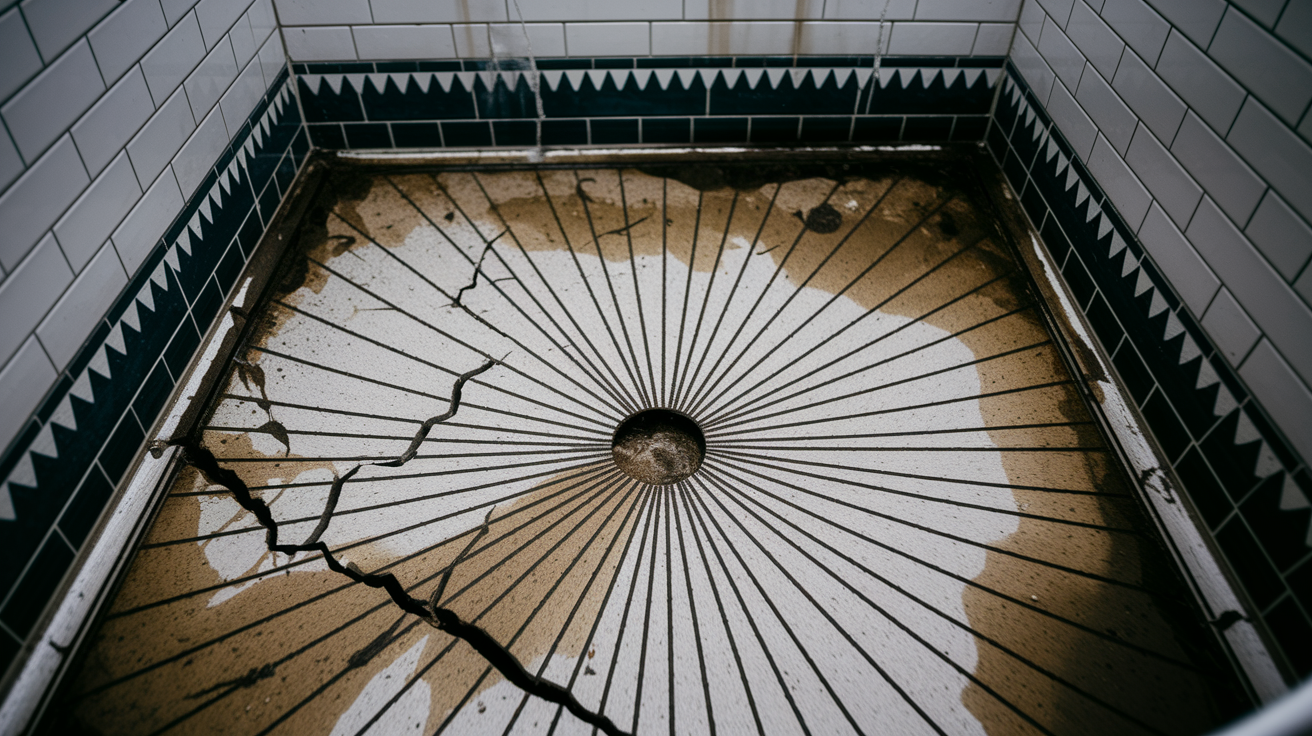
Noticed water stains on your bathroom ceiling? There’s a good chance your shower pan has a crack. The bad news is that these cracks let hundreds of gallons seep into your home every year, rotting floors and feeding mold. The good news is most cracked shower pans can be fixed without tearing out your entire shower, and you can handle many repairs yourself if you know what you’re dealing with. This guide walks you through testing your crack, choosing the right repair method, and getting it done so it actually lasts.
Determining If Your Cracked Shower Pan Can Be Repaired

Most shower pan cracks can be fixed if they meet specific criteria. The real question is whether the area around the crack flexes under pressure, and if it does, whether that soft spot measures less than a foot across.
Here’s your first test. Stand in the shower and put your full weight directly over the crack. Shift around slowly and feel for any give in the pan. If it feels solid, you’re dealing with a surface crack that’s pretty straightforward to fix. If you notice movement, you need to measure how big that soft area is by pressing down at different points and marking where the flexing stops.
No flexing means you’ve got a surface crack. Basic epoxy patch kit handles it because the support underneath is still good. You’re just sealing a break in the material.
For spots that flex under weight but stay under 1 foot across, you can still repair using high density support foam injection. This tackles both the missing support beneath the pan and seals the crack. The foam gives you the structural backing that should’ve been there from the start.
When that flexing zone goes beyond 1 foot, replacement becomes your better move. Support foam has limits, and trying to stabilize a large unsupported section typically doesn’t last. You end up with another failure in a few months.
Essential Tools and Materials for Shower Pan Crack Repair
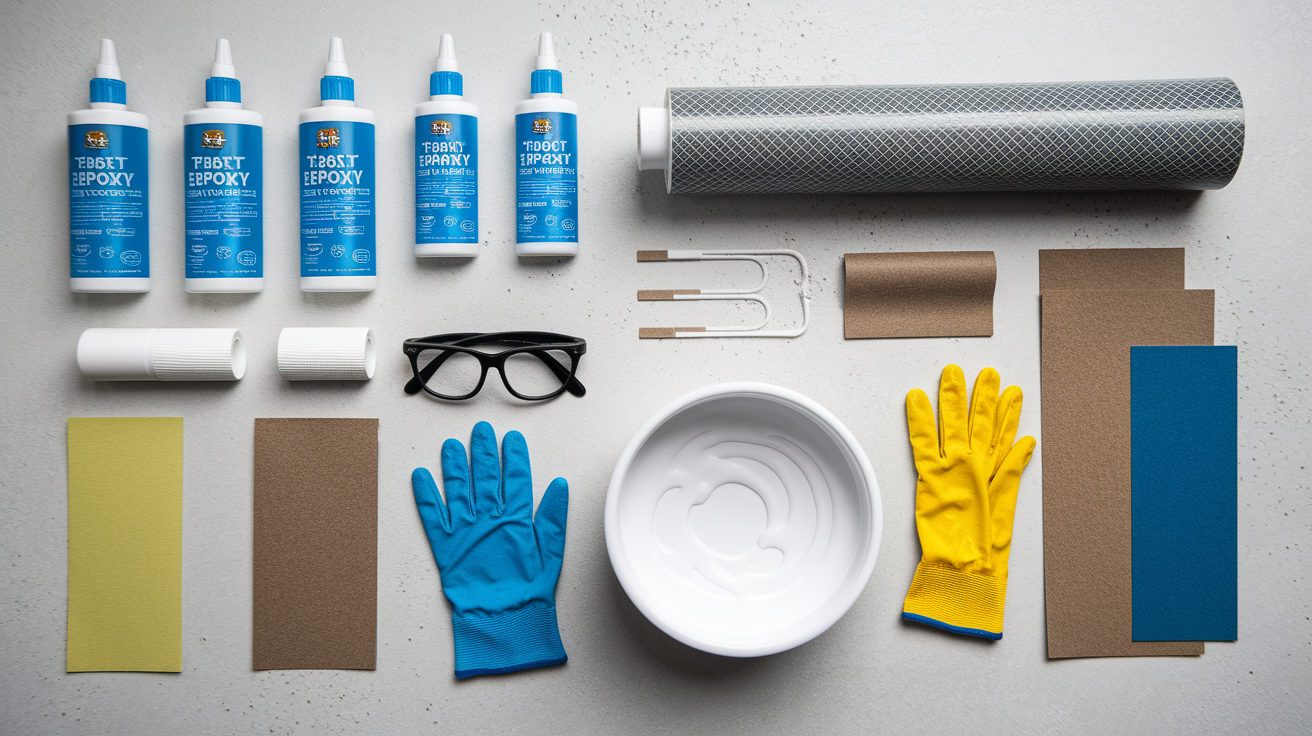
Having everything ready before you start prevents those annoying mid project runs to the store. It also ensures proper bonding while products are still at their working time. Most repairs fail because someone grabbed whatever was handy instead of the specific products designed for water exposure and the stress a shower pan takes.
You can find complete repair kits at home improvement stores and online. These include epoxy filler, reinforcement mesh, mixing trays, and finishing compounds that work together. For flexing pans, you’ll need to special order high density support foam. That spray foam at the hardware store won’t cut it. It compresses over time and your repair gives out.
| Material/Tool | Purpose | Notes |
|---|---|---|
| Epoxy filler (two part) | Fills and seals cracks with water resistant bond | Must be waterproof grade, not general epoxy |
| High density support foam | Provides structural support beneath flexing areas | Special order only. Hardware store foam will fail |
| Fiberglass reinforcement mesh | Strengthens repair area and bridges crack | Optional for hairline cracks, needed for wider breaks |
| Bonding agent/primer | Improves adhesion between pan material and filler | Specific to your pan material type |
| Sandpaper (80, 150, 220 grit) and sanding block | Preps surface and smooths cured filler | Wet dry paper works best for final smoothing |
| Mixing tray and stir sticks | Combines two part epoxy to proper consistency | Disposable types prevent cleanup issues |
| Nitrile gloves | Protects skin from epoxy and foam chemicals | Use chemical resistant, not latex exam gloves |
| Safety glasses | Protects eyes during sanding and chemical mixing | Required when mixing two part products |
Diagnosing Your Shower Pan Crack and Identifying the Cause
Before you fix anything, figure out what caused the crack. The repair that works depends entirely on what went wrong. Start with that detailed flex test. Apply your full weight to the cracked area and move systematically across the shower pan in all directions from the crack. Press down at multiple points in a grid pattern around the damage. Feel any give? Mark the boundaries of that soft area with tape or a marker. Measure across it. Areas under 1 foot can be repaired with support foam. Larger means replacement.
While you’re testing, check the entire pan for other soft spots away from the visible crack. Those tell you there’s widespread support problems.
What causes cracks guides how you fix them:
Structural settling from foundation movement. House settling creates stress points that crack rigid materials. You’ll often see diagonal cracks and might notice doors sticking or drywall cracks elsewhere.
Poor installation with uneven support or not enough adhesive. Lots of shower pans lack proper support from when they were installed. This is the most common reason for flexing areas and stress cracks.
Impact damage from dropped objects or hard scrubbing. A dropped bottle or aggressive cleaning creates a single crack radiating from that impact point. Usually repairable if the surrounding area has good support.
Age related material weakening. Older fiberglass and acrylic pans get brittle. You’ll typically see multiple small cracks or crazing across the surface instead of one large break.
Look below the shower for evidence of active leaking. In a basement installation, check the ceiling right under the shower for water stains, soft drywall, or discoloration. For second floor showers, inspect the ceiling of the room below. Dark rings or bubbling paint mean water’s been getting through.
Check if water pools in the shower instead of draining quickly. Standing water that sits for more than a few seconds puts constant pressure on any crack and makes leaks worse.
If you can get your hands on a moisture meter, test the subfloor around the shower. Readings above 15 to 20% mean ongoing water damage that needs addressing along with the crack repair.
The connection between cause and repair is straightforward. Impact cracks need sealing, flexing areas need support foam, widespread deterioration needs replacement.
Step by Step Shower Pan Repair for Non Flexing Cracks

This method only works for cracks in areas that don’t flex when you apply weight. If the area moves at all under pressure, skip ahead to the support foam repair section. Proper surface prep makes the difference between a repair that lasts years and one that fails in weeks.
Clean the crack and surrounding area thoroughly. Use a degreasing cleaner to remove soap scum, body oils, and any old caulk. Rinse completely and let it dry for several hours. The surface needs to be bone dry for adhesion.
Sand the crack area and 2 inches around it. Use 80 grit sandpaper to roughen the surface around the crack. This creates texture for the epoxy to grab onto. Sand down into the crack itself to remove loose material. Wipe away all dust with a damp cloth, then let it dry again.
Apply fiberglass mesh if the crack is wider than a hairline. Cut a piece of mesh that extends 2 inches beyond the crack in all directions. Press it onto the crack area. For cracks under 1/16 inch wide, skip the mesh.
Mix the two part epoxy filler. Put on your gloves and safety glasses. Follow the manufacturer’s ratio exactly. Most kits use equal parts resin and hardener. Stir thoroughly for at least two minutes. You’ve got about 10 minutes of working time once mixed, so work quickly but carefully.
Apply the epoxy filler. Using a putty knife or the applicator from your kit, spread filler over the entire crack and mesh. Press firmly to work it into the crack and through the mesh. Build up the filler slightly higher than the surrounding surface. Cover the crack completely with no gaps.
Allow initial setting. Let the filler set for 2 to 3 hours minimum at room temperature. If you can wait overnight, that’s better. Don’t touch it during this time. The surface will feel hard when ready for the next step, but it’s still curing beneath.
Sand the repair smooth and apply finishing coat. Use 150 grit sandpaper to remove high spots and level the repair with the surrounding pan. Move to 220 grit for a smooth finish. Clean away all dust. Apply the finishing polish or gel coat from your repair kit, feathering it out beyond the repair area to blend with the existing surface.
The filler sets hard enough to sand in 2 to 3 hours, but that doesn’t mean it’s fully cured. The chemical reaction continues. The finishing coat needs at least 24 hours to cure before any water contact. Using the shower too soon lets water penetrate and ruins the repair.
Your total active work time is only a few hours, but plan for a full day of cure time before the shower goes back into service.
Repairing Flexing Shower Pan Cracks with Support Foam
This repair tackles the actual problem: not enough support beneath the shower pan. The crack is just the symptom. This method works when the flexing area measures less than 1 foot across.
High density support foam isn’t the same product you buy in a spray can at the hardware store. Consumer grade expanding foam compresses under repeated weight and water exposure. It’ll feel solid for a few weeks, then start breaking down. Same flexing problem returns within a few months.
High density support foam designed for structural work maintains its load bearing capacity. Has to be specially ordered through professional suppliers or online sources that carry commercial grade products. The foam comes in two part systems that mix as they’re applied, expanding to fill voids while maintaining structural density.
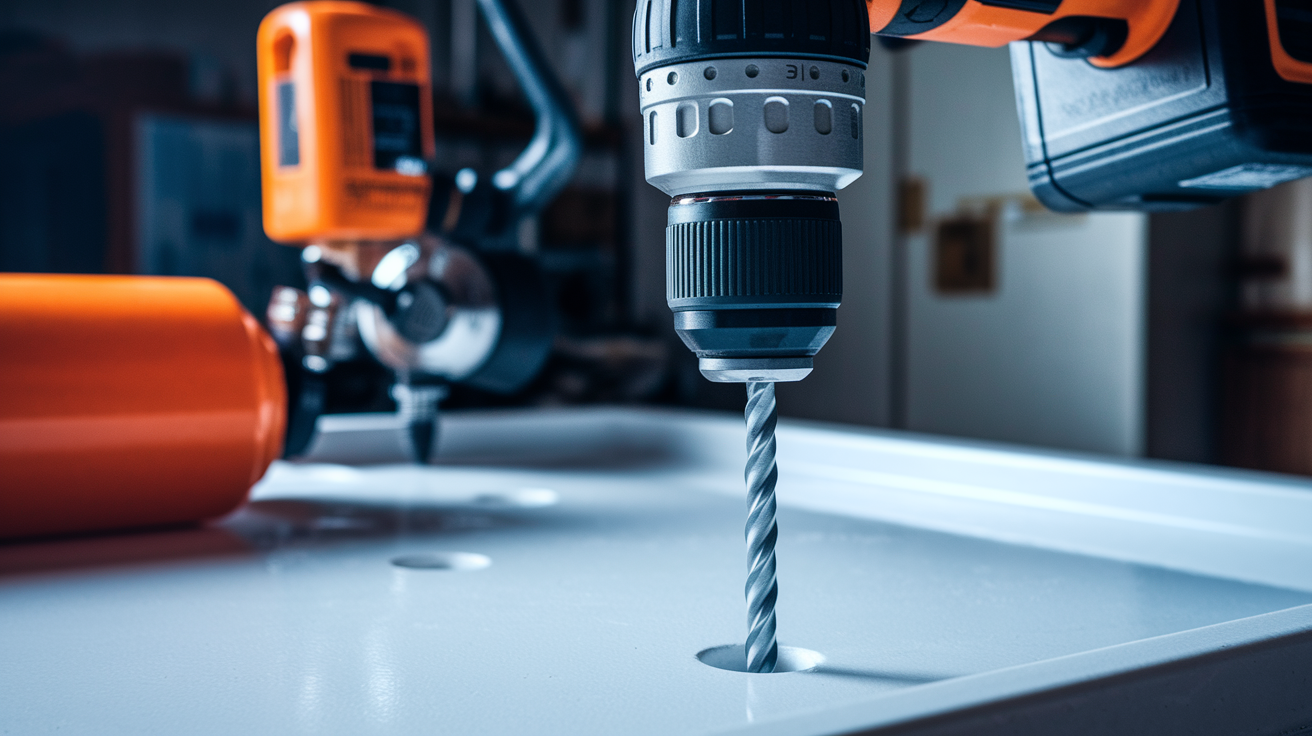
Drill access holes in the flexing area. Using a 1/4 inch bit, drill holes in a grid pattern across the flexing section. Space them about 3 to 4 inches apart. Drill straight down through the pan material. You’re creating injection points for the foam. Wear safety glasses because fiberglass or acrylic creates sharp dust.
Inject high density support foam. Following the foam manufacturer’s instructions, inject foam into each hole. Start with the holes furthest from the drain and work toward it. The foam expands as it cures, so fill each hole about halfway. It’ll rise and spread beneath the pan to fill the void. Wipe away any foam that comes back out immediately with a rag and acetone.
Allow foam to cure completely. High density structural foam takes longer to cure than the surface suggests. Even though it feels hard in an hour, the interior continues the chemical reaction. Cure time ranges from 1 to 3 days depending on the specific foam product and temperature. Check your product’s technical data sheet. Cold temperatures extend cure times.
Fill access holes with waterproof filler. Once the foam has fully cured, clean around each hole with degreaser. Mix waterproof epoxy filler and fill each hole, slightly overfilling so you can sand it flush. Let the filler cure according to its specs, usually 2 to 3 hours minimum.
Sand, clean, and refinish the repair area. Sand all filled holes flush with the surrounding surface using 150 grit, then 220 grit sandpaper. Clean thoroughly to remove all dust. Apply urethane acrylic coating matched to your shower pan color. Feather the coating beyond the repair area to blend it with the existing finish.
The extended cure time is necessary because the foam cures from the outside in. Using the shower before complete curing allows water to seep into partially cured foam, and the repair fails. Wait the full recommended time even though the surface feels solid.
When Shower Pan Replacement Is Better Than Repair
When the flexing area measures larger than 1 foot across, support foam reaches its practical limits. You can inject foam under that large an area, but the amount required and the lack of adequate hard points for it to bond to means the repair won’t hold up under daily use. The pan continues flexing at the edges of the foam area, creating new stress points and new cracks. You end up fixing the same shower repeatedly.
Specific situations that point to replacement instead of repair:
Multiple cracks scattered across different areas of the pan. This shows widespread material failure or extensive support problems. Repairing individual cracks doesn’t address the underlying weakness.
Visible structural damage to the subfloor or floor joists. If wood beneath the pan shows rot, warping, or water damage, those structural elements need replacement before any pan work. At that point, installing a new pan makes more sense than trying to save a cracked one.
Extensive water damage below the shower. Ceiling damage, mold growth, or structural deterioration in the space below means the leak has been ongoing. The waterproof integrity is compromised beyond what a crack repair can restore.
Very old shower pans showing material deterioration. Fiberglass and acrylic become brittle with age. If your pan is 20 plus years old and showing crazing, discoloration, or brittleness, fixing one crack just buys a few months until the next one appears.
Recurring cracks after previous repair attempts. If you’ve already repaired the same area once and it cracked again, the underlying cause wasn’t addressed. Continuing to patch is throwing money away.
For borderline cases, professional assessment helps. Someone experienced with shower pan installation and repair can determine if your specific situation is at the edge of what’s fixable or if you’re better off replacing. That consultation might cost $100 to $200, but it prevents spending $200 on materials and a weekend of work for a repair that fails in six months.
Contact Local Water Damage Repair Services for a professional assessment if you’re unsure whether repair or replacement makes more sense.
Replacement costs significantly more upfront than repair. But it provides long term durability and typically includes warranties covering materials and labor for 1 to 5 years depending on the installer. You get a fresh start with proper waterproofing and support instead of patching a failing system. When the structural integrity is questionable, replacement is the financially smarter choice despite the higher initial cost.
Cost Breakdown for Shower Pan Crack Repair vs Replacement
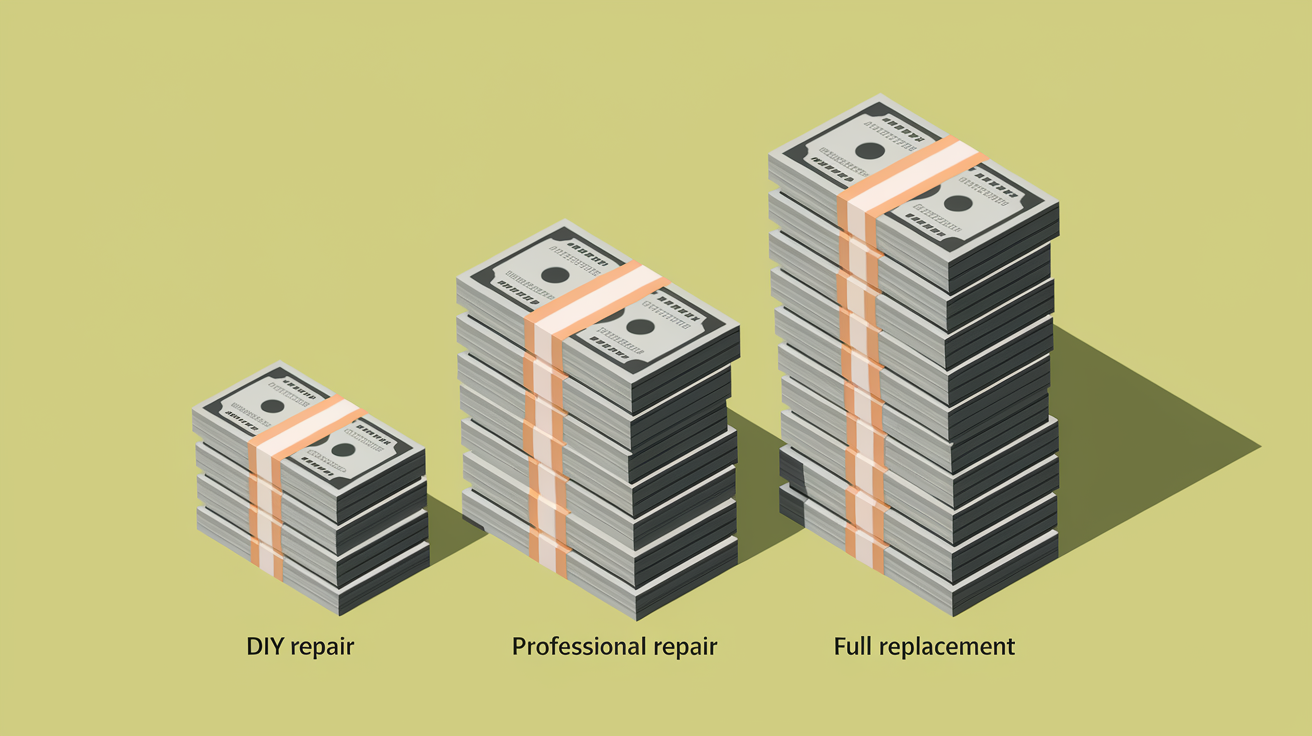
Understanding the cost differences helps you make a realistic decision about repair versus replacement. DIY saves labor costs but requires you to do the work correctly. Professional services cost more but include expertise and warranty protection.
Regional variations affect costs significantly. Urban areas with higher labor rates run 20 to 40% more than rural or suburban markets. The specific condition of your shower and accessibility also impact professional quotes. These ranges give you realistic expectations for budgeting.
| Repair/Replacement Type | DIY Cost Range | Professional Cost Range | Timeline |
|---|---|---|---|
| DIY epoxy patch for small non flexing cracks | $25 to $60 | $150 to $300 | 3 to 4 hours active work, 24 hours cure time |
| DIY support foam repair for flexing areas | $80 to $200 | $400 to $800 | 4 to 6 hours active work, 1 to 3 days cure time |
| Professional shower pan relining | Not DIY suitable | $800 to $1,800 | Completed in 3 hours, 24 hour cure before use |
| Professional pan replacement with minimal demolition | Not recommended | $1,200 to $2,500 | 1 to 2 days including demolition and installation |
| Full replacement with tile removal and reinstallation | Not recommended | $2,500 to $5,500 | 3 to 5 days for complete demolition, pan, tile, grouting |
DIY repairs cost way less in materials but require confidence in your ability to prep surfaces properly, mix products correctly, and follow cure time specs. A failed DIY repair means paying for professional work anyway, and potentially dealing with additional water damage in the meantime.
Professional services include proper diagnosis, appropriate materials, experienced application, and usually a warranty that covers the work if something goes wrong. The cost difference reflects that peace of mind and guaranteed waterproofing.
Timeline matters when you’re down one shower. DIY gives you flexibility to work on your schedule, but you might lose a weekend plus cure time. Professionals get it done faster but you’re working around their schedule. Relining services offer the fastest turnaround for extensive pan damage, completing a full restoration in one day with next day use. Traditional replacement takes multiple days because of demolition, waterproofing cure times, and finish work.
Waterproofing and Preventing Future Shower Pan Cracks

Prevention and regular maintenance protect your investment whether you’ve just completed a repair or had a professional replacement. Untreated cracks lead to water damage that costs thousands more than the original repair would have. Mold remediation alone runs $2,000 to $6,000 depending on extent. Foundation or structural damage from ongoing leaks becomes a five figure problem.
Simple maintenance practices that extend shower pan life:
Inspect grout lines and caulk every 6 months. Look for gaps, cracking, or missing sections. Re-caulk around the pan perimeter and re-grout tile joints before water gets through.
Use pH neutral cleaning products. Harsh acidic or alkaline cleaners break down pan materials and grout over time. Stick with products labeled for acrylic or fiberglass showers.
Avoid dropping heavy objects. Be careful with glass bottles, metal razors, and cleaning tools. Even small impacts can crack pans, especially older ones.
Ensure water drains completely after each use. Standing water puts constant pressure on the pan material and any existing weak points. If drainage slows, clear the drain promptly.
Apply waterproofing sealant annually to porous surfaces. If you have a tile shower floor, apply penetrating sealer yearly. This prevents water from getting under tile and weakening the mortar bed.
Address any leaks or moisture immediately. Don’t wait. A small leak becomes major damage quickly. Fix dripping fixtures, repair caulk failures, and investigate any musty smells right away.
Proper installation with adequate support structure prevents most shower pan cracks. Many pans fail because the installer didn’t provide full support beneath the pan. Pre formed acrylic and fiberglass pans need a mortar bed or support bed to prevent flexing. The pan shouldn’t bridge across joists with empty space underneath. When that happens, normal use creates stress that eventually cracks the material.
Waterproof membranes installed under mortar beds or behind tile provide a critical backup layer. If water does get through grout or the pan surface, the membrane keeps it from reaching the subfloor. Quality installation includes these layers even though you can’t see them in the finished shower.
Testing your shower drain periodically catches problems early. Once a month, plug the drain and fill the pan with an inch of water. Mark the waterline and let it sit for an hour. If the level drops, you have a leak somewhere. That early warning lets you investigate and repair a small problem before it becomes water damage.
Watch for typical early warning signs. Grout that stays damp longer than it should, caulk that pulls away from the wall or pan, musty smells that appear after showering, or soft spots developing in the pan. Catching these signs early means a small repair instead of a major problem.
Common Shower Pan Repair Mistakes to Avoid

Many DIY shower pan repairs fail within weeks or months because of preventable mistakes. Understanding what goes wrong helps you avoid wasting time and materials on repairs that don’t hold.
Common errors that cause repair failures:
Using silicone caulk as a permanent crack repair. Silicone provides temporary water resistance but doesn’t bond structurally or create a lasting seal on flexing cracks. It pulls away from the crack edges within weeks.
Using consumer grade expanding foam instead of high density support foam. Hardware store spray foam compresses under weight. It feels solid initially but breaks down with use, and your flexing problem returns.
Skipping proper surface preparation and sanding. Epoxy and fillers need clean, roughened surfaces to achieve proper adhesion. Applying filler to smooth or dirty surfaces means it peels off in sheets.
Rushing cure times to use the shower sooner. Using the shower before complete curing allows water penetration into the repair. The filler or foam hasn’t fully hardened, and moisture compromises the chemical bond.
Ignoring the root cause of flexing and only patching the crack. If the pan flexes because of inadequate support, sealing the crack doesn’t stop the flexing. A new crack forms next to your repair within weeks.
Attempting support foam repair on flexing areas larger than 1 foot. Large unsupported areas can’t be reliably stabilized with foam. The repair might feel solid initially but fails as the foam compresses unevenly under use.
Using the shower during cure time. Water exposure during the curing process prevents proper chemical bonding in epoxies and structural foams. Even if the surface feels hard, the interior is still reacting.
Proper diagnosis and following manufacturer cure time specs make the difference between a repair that lasts years and one that fails in weeks.
Surface prep directly affects how well filler bonds to the pan material. Skipping the sanding step because you want to save time costs you the entire repair when it peels off.
Cure times exist because the chemical reaction takes time to complete even after the surface feels hard. Epoxy might feel sandable in 2 hours, but full structural strength takes 24 hours. Foam might feel solid in an hour, but interior curing continues for days. Using the shower too soon interrupts this process and the repair fails.
The wrong materials produce the same result as no repair. Silicone has its place for flexible joints and gaps, but it doesn’t create structural bonds. It’s a temporary measure to stop water while you prepare for proper repair. Consumer grade foam lacks the density and compression resistance for load bearing applications. It’s designed for insulation and gap filling, not supporting human weight repeatedly. These products fail because they’re being asked to do jobs they weren’t engineered for.
Understanding Different Shower Pan Materials and Repair Approaches

Shower pans come in different materials, and each has specific characteristics that affect how you repair cracks. Using the wrong repair product for your pan material means the fix doesn’t bond properly and fails quickly.
Fiberglass and Acrylic Shower Pans
These are the most common materials in residential showers and the most DIY friendly for crack repair. Fiberglass consists of woven glass fibers bonded with resin. Acrylic is a solid plastic material, usually reinforced with fiberglass backing.
Both materials respond well to epoxy repair compounds and fiberglass mesh reinforcement. The repair products chemically bond with the pan material, creating a permanent water resistant seal.
These materials do require adequate support beneath them because they flex under weight when unsupported. That’s why so many of these pans develop cracks from poor installation. The material itself is durable when properly backed.
Stone Resin and Composite Bases
Stone resin pans blend crushed stone with resin binders to create a dense, heavy material. These pans are heavier than acrylic or fiberglass and less prone to flexing from inadequate support.
When they do crack, it’s usually from impact damage or material stress rather than flexing. They can be repaired using specialized epoxy compounds formulated to bond with stone and resin composites. The repair process is similar to fiberglass, but you need products specifically rated for stone resin.
Regular fiberglass repair epoxy might not achieve proper adhesion to the mineral content in these pans. Check your repair product specs to confirm compatibility with stone resin materials.
Mortar Bed and Tile Shower Pans
Traditional tile showers are built differently. They have a waterproof membrane underneath a sloped mortar bed that’s then tiled. The tile and grout are not the waterproofing layer. The membrane is.
When you see cracks in a tile shower floor, the tile might be cracked but you need to determine if the membrane beneath is also compromised. Water staining below the shower confirms membrane failure.
Repairing these installations often requires removing damaged tile, assessing and repairing or replacing the membrane section, rebuilding the mortar bed, and installing new tile. This is a multi day project requiring specialized skills. Small grout cracks can be regrouted, but actual tile cracks or mortar bed damage is more involved than surface pan repairs.
Pre Formed Shower Bases
Various manufacturers make pre formed bases from different proprietary materials. These include ABS plastic, cultured marble (crushed marble in resin), solid surface materials, and various composite blends. Each has different characteristics.
ABS plastic bases are lightweight and somewhat flexible. Cultured marble is heavy and brittle. Solid surface materials are dense and non porous.
Repair approaches vary significantly by the specific material. Some require special bonding agents. Others won’t accept standard epoxy repairs. You need to identify not just that you have a pre formed base, but what specific material it’s made from.
Check manufacturer documentation or contact the manufacturer directly for repair recommendations.
Before you buy repair supplies, identify what your shower pan is made from. Look for manufacturer stamps or labels under the drain or on the underside if accessible. Feel the material. Fiberglass has a textured back, acrylic is smooth front and back, stone resin is very heavy and dense.
Using incompatible repair products leads to failure even if you follow all the steps correctly. The repair simply doesn’t bond to the base material.
Signs You Need Professional Help with Shower Pan Repair
Many shower pan cracks fall within DIY capability if you’re comfortable with basic repair work. But certain situations require professional expertise to address safely and effectively.
Recognizing when you’re outside DIY territory prevents making problems worse. Trying to repair something that requires professional tools, expertise, or permits can result in additional damage and higher costs when you eventually call someone.
Indicators that professional assessment or repair is needed:
Visible structural damage to subfloor or floor joists. Rotted wood, sagging joists, or heavily water damaged subfloor means the leak has caused significant damage. Repairing the pan without addressing structural damage underneath is pointless and potentially unsafe.
Mold growth beneath or around the shower area. Active mold requires professional remediation. You need to address the moisture source, remove contaminated materials properly, and ensure complete drying before any repairs. Mold creates health hazards when disturbed improperly.
Ceiling damage or staining in the room below. Water staining, bubbling paint, or soft drywall on the ceiling beneath the shower indicates significant ongoing leakage. The waterproofing has failed beyond what a simple crack repair addresses.
Flexing areas measuring larger than 1 foot diameter. Large unsupported sections can’t be reliably repaired with DIY methods. Professional replacement provides the only long term solution.
Multiple cracks in different areas of the pan. Widespread cracking indicates material failure or extensive support problems. Patching individual cracks doesn’t address the underlying issue causing repeated failures.
Water damage extending beyond the immediate shower area. If adjoining rooms show moisture damage, water staining, or structural issues, the leak is extensive and requires comprehensive professional assessment.
Foundation settling causing structural movement. If your crack resulted from foundation settling, addressing only the pan doesn’t stop the movement. You might need foundation repair consultation along with shower work.
Situations requiring building permits or code compliance. Major shower replacements, structural repairs, or work affecting waterproofing in multi unit buildings often require permits. Professionals handle permit requirements and ensure code compliance.
Even if you’re planning DIY repair, professional assessment provides valuable information. A qualified plumber or shower specialist can confirm your diagnosis, verify that repair is the appropriate approach, and identify any underlying issues you might have missed.
This consultation typically costs $100 to $200 but prevents spending time and money on a repair that won’t hold. Contact Professional Water Damage Services if you see any of these warning signs or want expert confirmation before proceeding with repairs.
Professional services complete repairs or relining quickly. What might take a DIYer an entire weekend of work, professionals complete in 3 hours for relining or 1 to 2 days for full replacement. They bring specialized tools, commercial grade materials, and experience that produces reliable results.
The cost difference between DIY materials and professional service often narrows when you factor in specialized tools you need to buy, potential mistakes requiring material replacement, and the value of your time.
For straightforward surface cracks in non flexing areas, DIY makes sense. For anything involving structural support, extensive damage, or uncertainty about the right approach, professional help provides better long term value.
Final Words
A cracked shower pan doesn’t automatically mean you’re facing a full replacement. Most cracks can be successfully repaired if they pass the flex test and the affected area is under a foot in diameter.
Surface repairs with epoxy work great for hairline cracks. Flexing areas need proper high-density support foam, not hardware store substitutes.
Remember that cracked shower pan repair only works long-term when you address what caused the crack in the first place. Skipping the diagnosis step just sets you up for another repair down the road.
If you’re dealing with extensive damage, large flexing areas, or structural concerns, professional assessment saves time and money in the long run.
FAQ
Can a crack in a shower base be repaired?
A crack in a shower base can be repaired if the area around the crack doesn’t flex under pressure or if any flexing area is smaller than 1 foot in diameter. Non-flexing hairline cracks are easily fixed with epoxy patch kits, while small flexing areas can be repaired with high-density support foam.
How much does it cost to repair a cracked shower pan?
The cost to repair a cracked shower pan ranges from $15 to $50 for DIY epoxy patch repairs on small cracks, while professional support foam repairs run $200 to $500. Professional relining services cost between $800 and $1,500, and full replacement with professional installation typically ranges from $1,200 to $3,500.
Can you repair a cracked shower tray?
A cracked shower tray can be repaired depending on the crack’s severity and whether the damaged area flexes under weight. Stone resin and acrylic trays respond well to specialized epoxy compounds, while fiberglass trays can be patched with fiberglass mesh and epoxy filler for durable, water-resistant repairs.
How do I fix a crack in the bottom of my shower?
To fix a crack in the bottom of your shower, first perform a flex test by applying body weight to determine if the area moves. For non-flexing cracks, clean and sand the area, apply epoxy filler, let it cure overnight, then sand smooth and finish. For flexing areas under 1 foot, drill access holes and inject high-density support foam.
What causes shower pan cracks?
Shower pan cracks are caused by four primary factors: structural settling from foundation movement, poor installation with uneven support or insufficient adhesive, impact damage from dropped objects or vigorous scrubbing, and age-related material weakening. Many shower pans lack proper support when installed during construction, making flexing and eventual cracking more likely.
How long does a shower pan repair take to cure?
A shower pan repair takes 2 to 3 hours for epoxy filler to set, but overnight curing is better for strength. The final finishing coat requires at least 24 hours before shower use, while support foam repairs need 1 to 3 days of cure time depending on the specific foam product used.
When should I replace instead of repair a cracked shower pan?
You should replace instead of repair a cracked shower pan when the flexing area is larger than 1 foot in diameter, multiple cracks appear across the pan, or visible structural damage affects the subfloor. Recurrent cracking after previous repairs or extensive water damage below the shower also indicates that replacement is the better long-term solution.
What type of foam should I use for shower pan repair?
You should use specially ordered high-density support foam for shower pan repair, not consumer-grade foam from general hardware stores. Consumer-grade foam will not hold applied weight for extended periods and will fail, while high-density support foam provides proper load-bearing capacity for areas up to 1 foot in diameter.
Can I use silicone to fix a cracked shower pan?
Silicone should not be used as a long-term solution for cracked shower pans, only as a temporary emergency measure. While silicone provides temporary water resistance, it doesn’t address structural issues or bond properly with shower pan materials, leading to eventual failure and potentially more extensive water damage.
How do I know if my shower pan crack is leaking?
You know if your shower pan crack is leaking by checking for ceiling damage or water staining in the room below, musty odors around the shower, soft spots in surrounding flooring, or standing water that doesn’t drain properly. A moisture meter can detect hidden water damage in subfloors even when visual signs aren’t obvious.
What materials do I need to repair a shower pan crack?
To repair a shower pan crack, you need epoxy filler or resin compound, high-density support foam for flexing areas, reinforcement mesh for larger cracks, bonding agent, sandpaper or sanding block, mixing tray, protective gloves, and safety glasses. Pre-packaged repair kits available at DIY stores contain most essential materials for small crack repairs.
How can I prevent future shower pan cracks?
You can prevent future shower pan cracks by regularly inspecting grout and caulk lines, using appropriate cleaning products, avoiding heavy impacts, ensuring proper drainage, applying periodic waterproofing sealant, and addressing leaks immediately. Proper initial installation with adequate support and waterproof membranes is critical to preventing stress cracks from developing.